This post may contain affiliate links. Please read our disclosure policy.
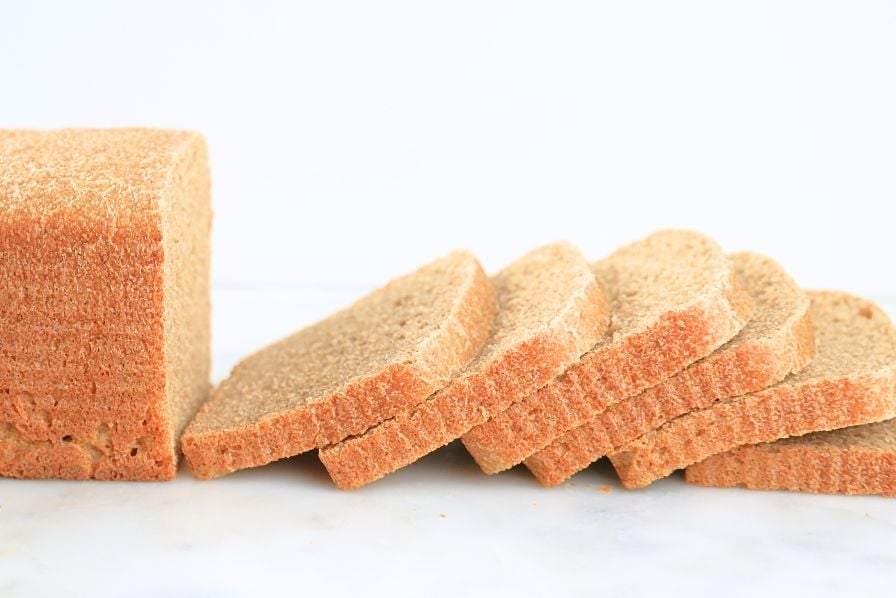
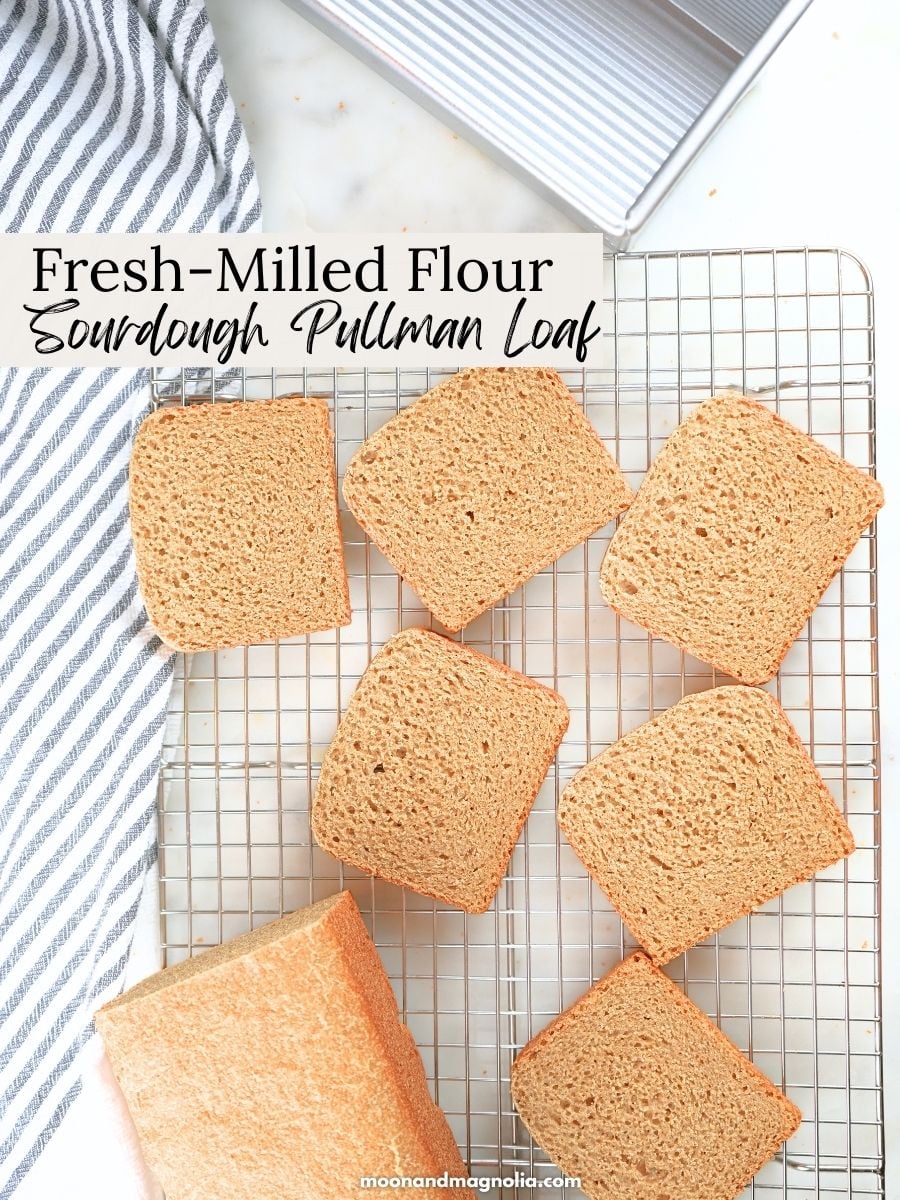
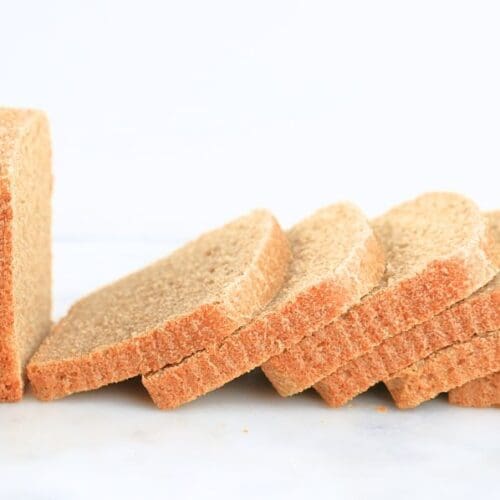
This fresh-milled sourdough Pullman loaf is pillowy soft and absolutely delicious. With a thin crust, tender crumb, and mild flavor, it’s as close as you can get to store-bought white bread texture-but with 100% whole-grain nutrition!
One of the questions I get asked all the time is, "How do you make softer bread with fresh-milled flour?"
There are a few ways to do this. You can bump up the hydration or add ingredients that tenderize the crumb.
In my fresh-milled sourdough sandwich bread, for example, I use an extra egg and honey to make it softer. And in my sourdough einkorn bread and same-day fresh-milled sourdough, I changed the amount of water.
They are all delicious and soft, but for some people, they are still not quite as pillowy as they'd like.
The other option is to make this insanely delicious sourdough Pullman loaf. It's hands-down the softest bread I've ever made with fresh-milled flour.
The secret? A little vital wheat gluten and sunflower lecithin, both natural additives that soften the bread and improve its gluten structure.
Additionally, this loaf is baked in a covered Pullman pan, which helps create an ultra-soft crust and tender crumb. If you're looking for a soft whole wheat sourdough sandwich bread, look no further.
Ps. If you are brand new to milling flour at home, be sure to check out my Beginner’s Guide to Fresh-Milled Flour.
Why You’ll Love This Recipe
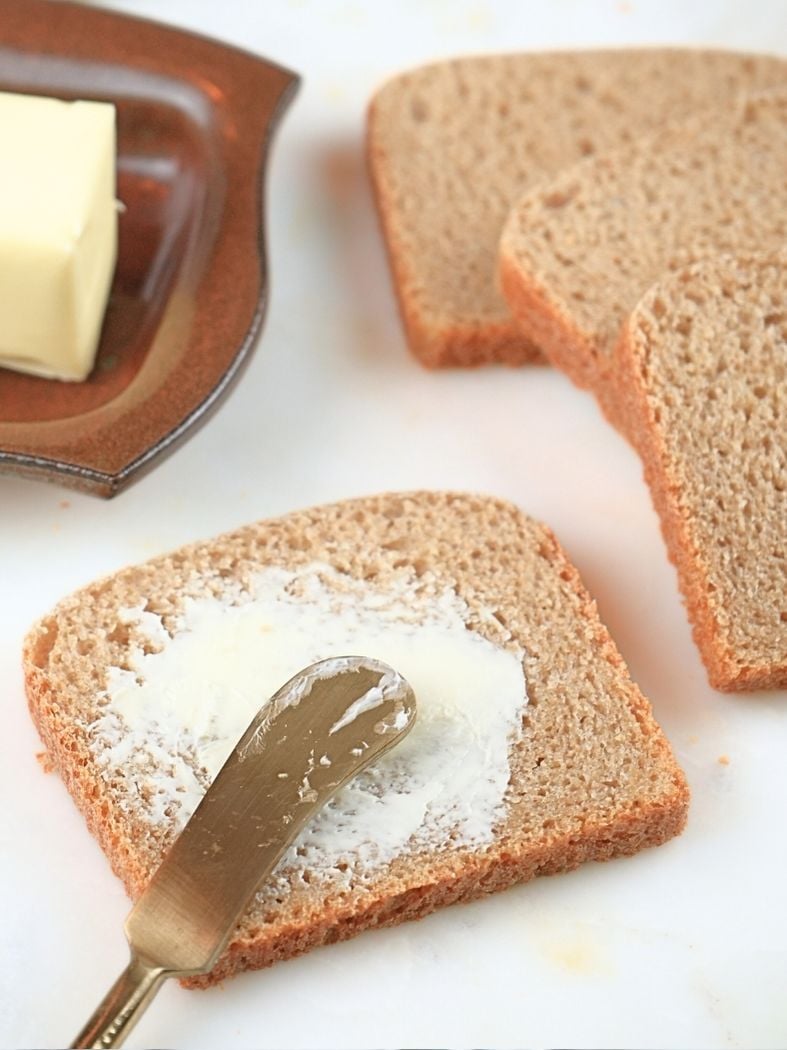
Soft and Sliceable: This bread slices like a dream. It’s super soft and is perfect for sandwiches and toast.
100% Whole Grain: Because it is made with all fresh-milled wheat, it is packed with whole grain nutrition.
Sourdough: This pullman loaf is naturally leavened with sourdough starter, so you get all of the goodness of fermented grains.
Freezer-Friendly: Make a few loaves on baking day, then freeze them for easy homemade bread in a pinch.
Longer Shelf Life: Fresh-milled bread is notorious for molding quickly. But the sunflower lecithin improves the shelf life.
Ingredients
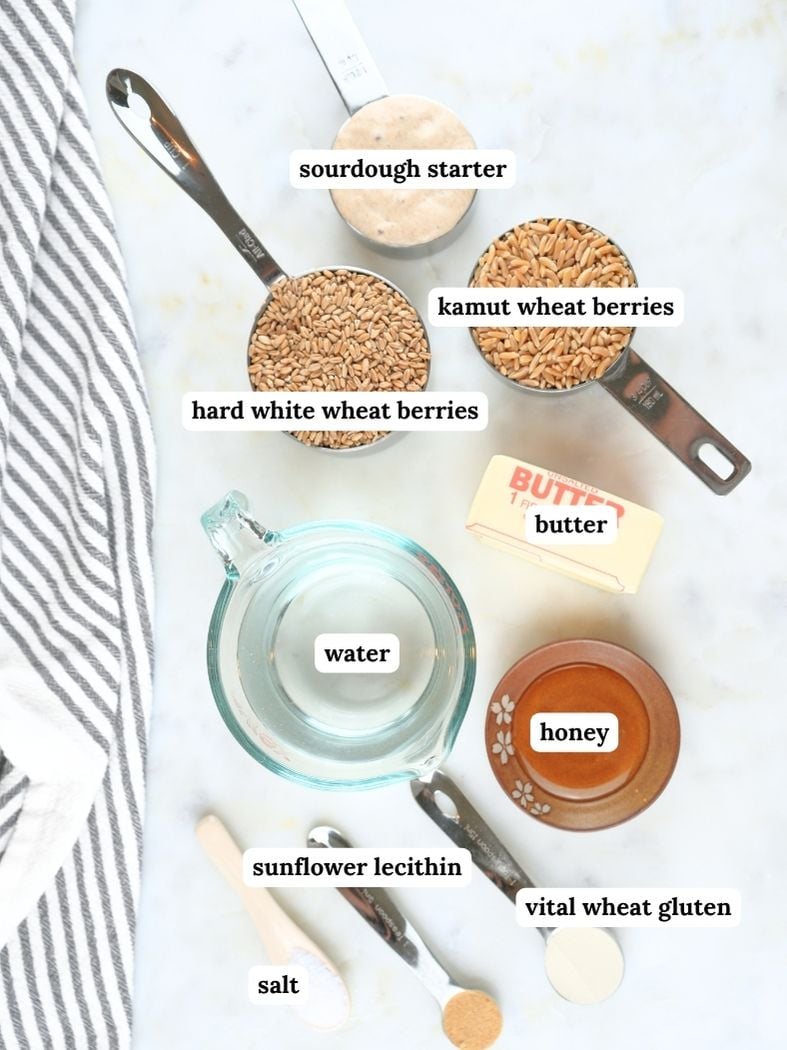
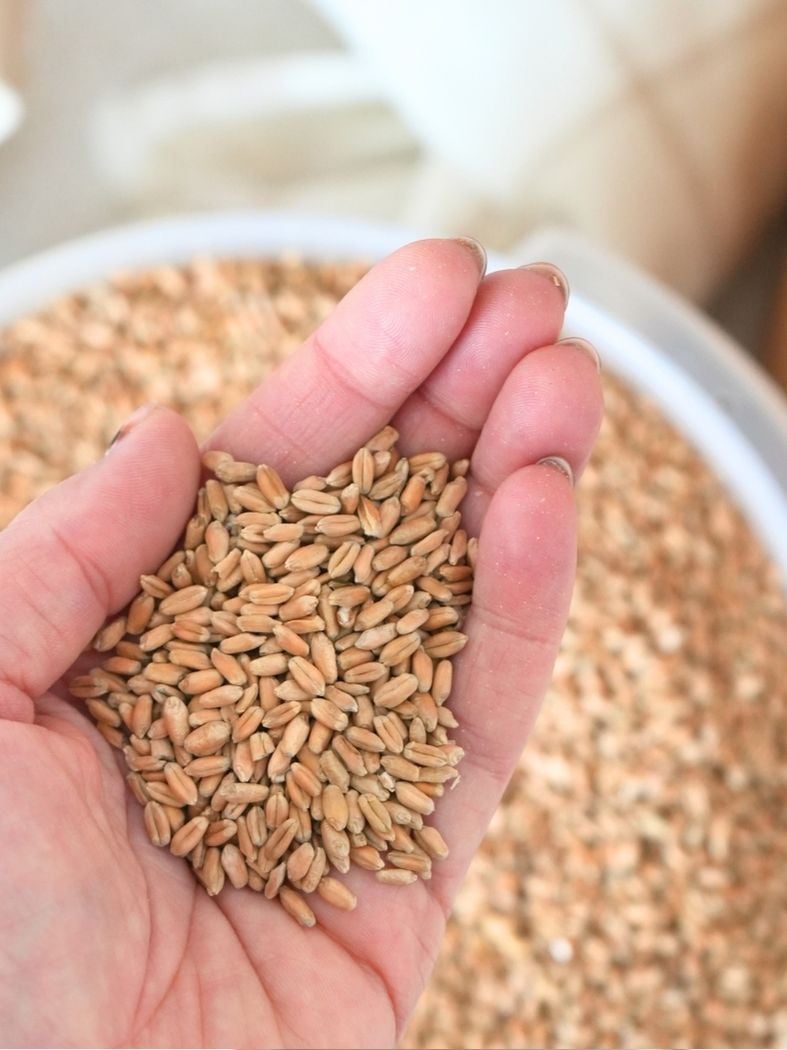
Wheat Berries: You will need hard wheat berries for this recipe. I recommend hard white and kamut wheat berries.
Vital Wheat Gluten: Vital wheat gluten strengthens the dough's structure, helping the bread rise higher, hold its shape, and develop a softer crumb. I use Anthony’s vital wheat gluten.
Sunflower Lecithin: Sunflower lecithin is a natural emulsifier that helps bread stay softer longer, improves moisture retention, and creates a finer, more even crumb. I use NOW Food’s sunflower lecithin.
Sourdough Starter: Use active or inactive sourdough starter. You can make this recipe with a fresh-milled sourdough starter or all-purpose starter.
Butter: Use unsalted, softened butter.
Honey: Honey adds flavor and moisture for a tender crumb.
Get the full list of ingredients and measurements on the printable recipe card below.
Tools You Will Need
Grain Mill: You will need a grain mill for this recipe. I use a Mockmill 200 Professional. Popular brands also include Nutrimill and KoMo.
Stand Mixer: A stand mixer brings the dough together quickly. I love my KitchenAid bowl-lift mixer.
Pullman Pan: To create the soft crust and traditional square shape, you will need a Pullman pan. This recipe was developed for a 13″x4″ Pullman pan.
Step-by-Step Instructions
Step 1: Just before prepping the dough, mill the hard white wheat and kamut on the finest setting.
(If you are measuring in volume, you should have about 4 1/3 cups total flour after milling.)
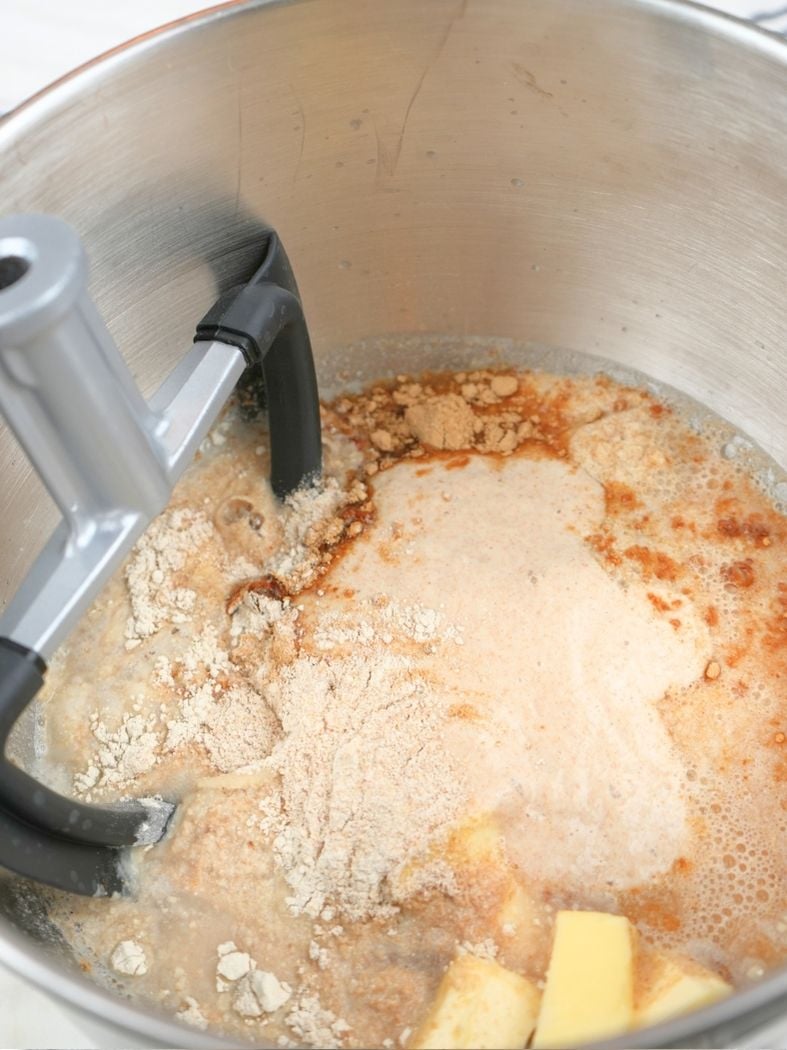
Step 2: In the bowl of a stand mixer, add the freshly milled flour, vital wheat gluten, sunflower lecithin, water, sourdough starter, butter, and honey (do not add the salt yet).
Step 3: Using a paddle attachment, mix the ingredients together on low. Mix until just combined.
Cover with a towel and allow the dough to rest (aka autolyze) for 30 minutes to 1 hour.
The dough may seem too wet at this point. But the autolyzing will allow the flour to hydrate fully, so don’t add extra flour.

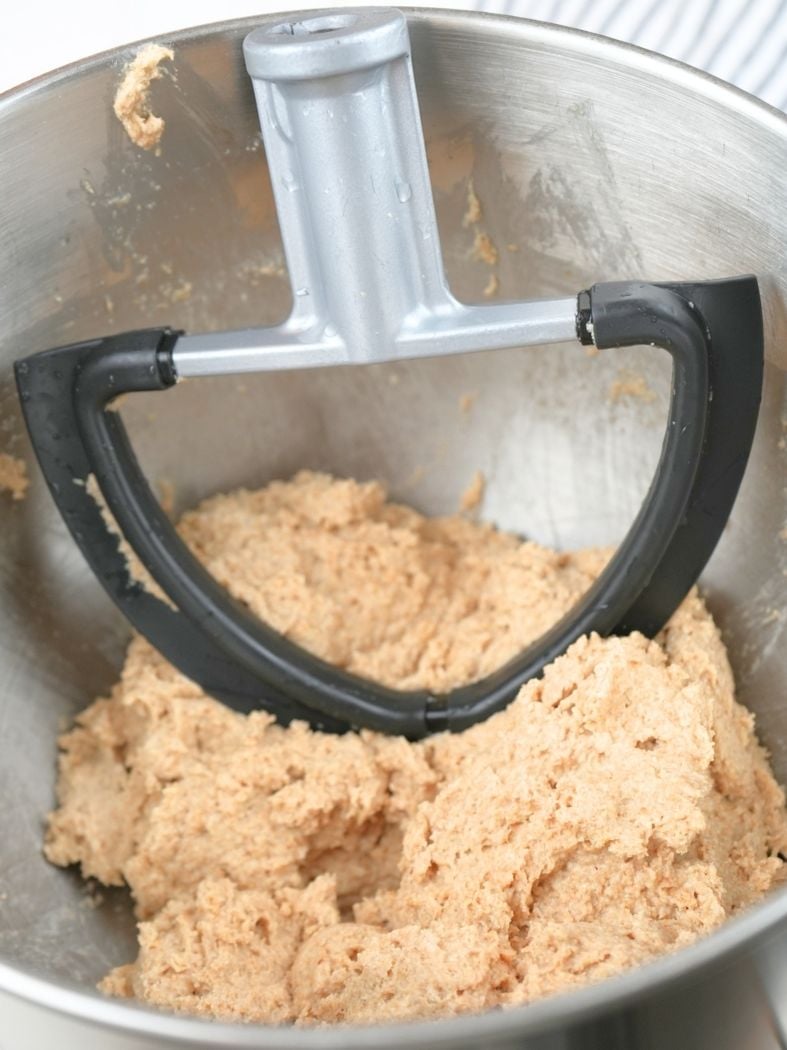
Step 4: Add the salt. Then, switch to the dough hook and knead on low until the dough forms a cohesive ball.
If it is still sticky, add 1 tablespoon at a time of fresh-milled flour (hard white or kamut) until slightly tacky but not clinging to your hands. I usually need 2-3 tablespoons.
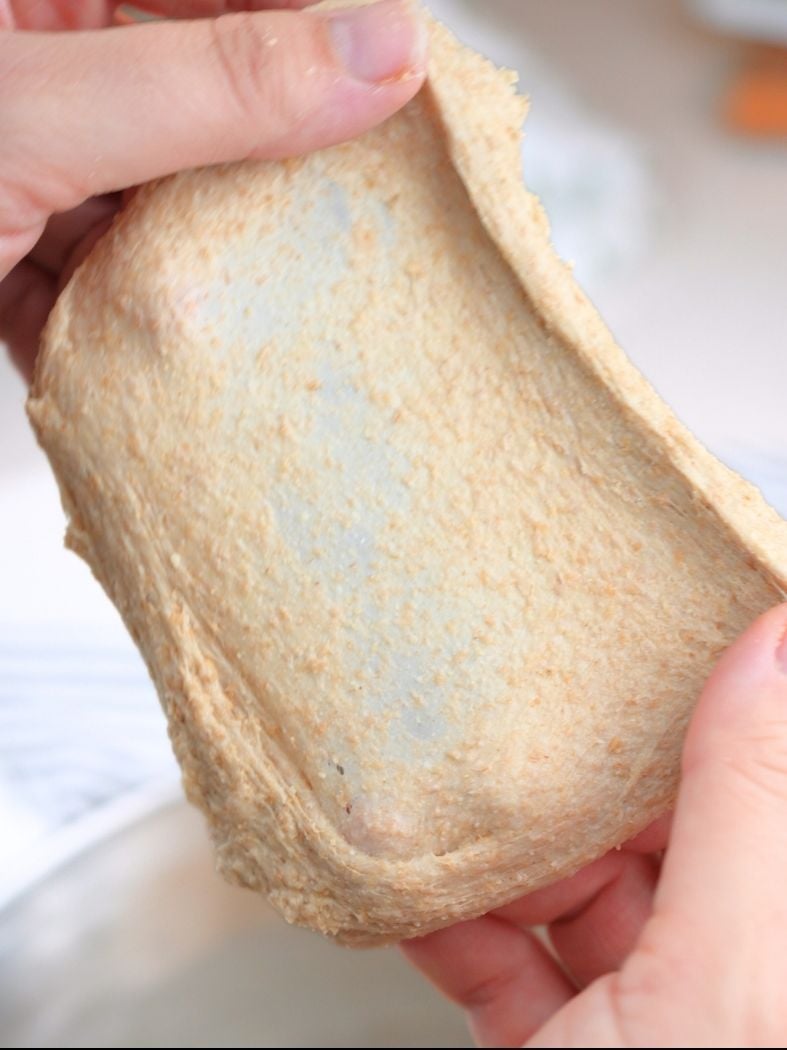
Step 5: Once the dough is the right consistency, knead it until it is smooth, elastic, and passes the windowpane test. This usually takes me about 10 minutes.
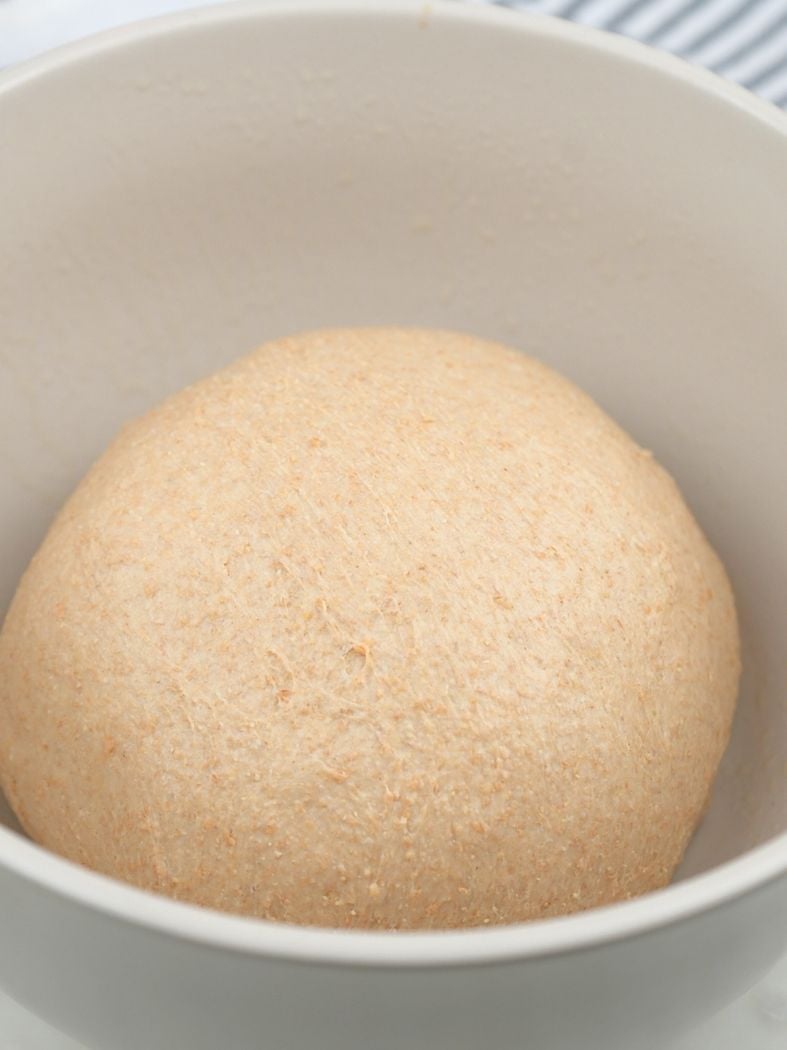
Step 6: Transfer the dough to an oiled bowl. Cover with a damp towel and allow it to bulk ferment until it has doubled in size and is domed on top. This usually takes 3-5 hours at 75°F.
The warmer the room, the faster it will ferment. The cooler, the slower it will ferment. Watch the dough, not the clock.

Step 7: Butter or grease a 13″ Pullman loaf pan. Then, turn the dough out onto a clean work surface.
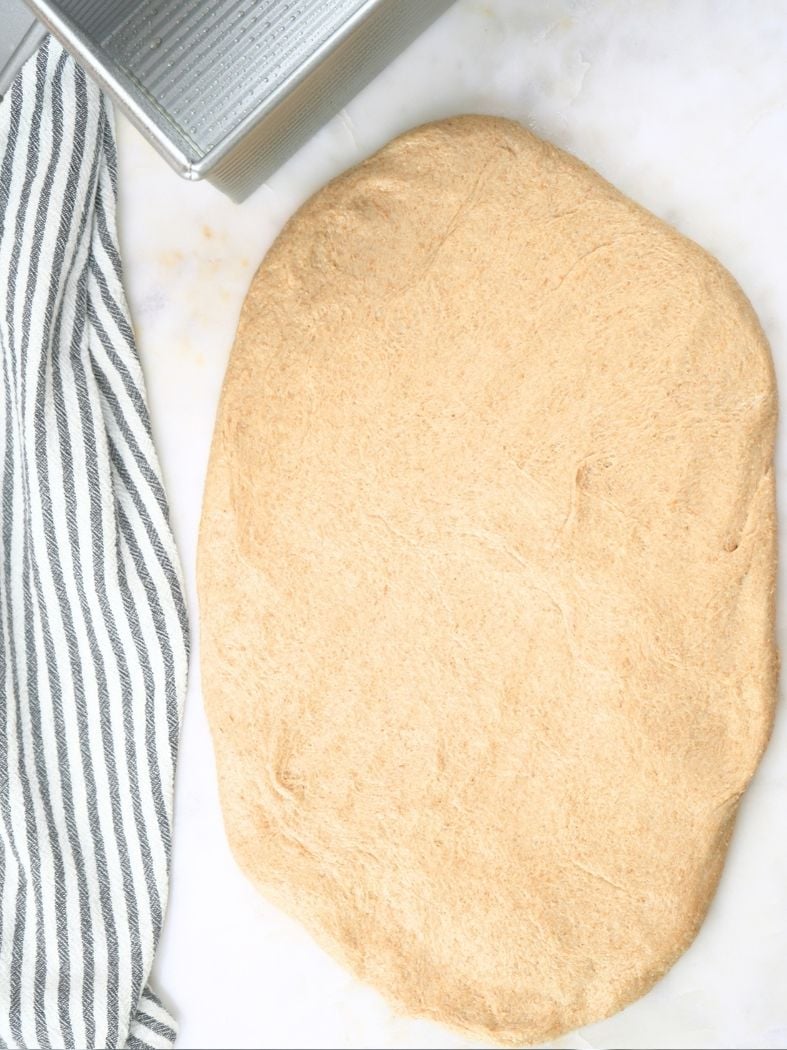
Step 8: Gently stretch the dough into a 13″ rectangle-ish shape.

Step 9: Starting with the long edge of the dough closest to you, roll the dough into a tight log.
To do this, tuck and pull back on the dough as you roll to create tension. Then, pinch the seams together.
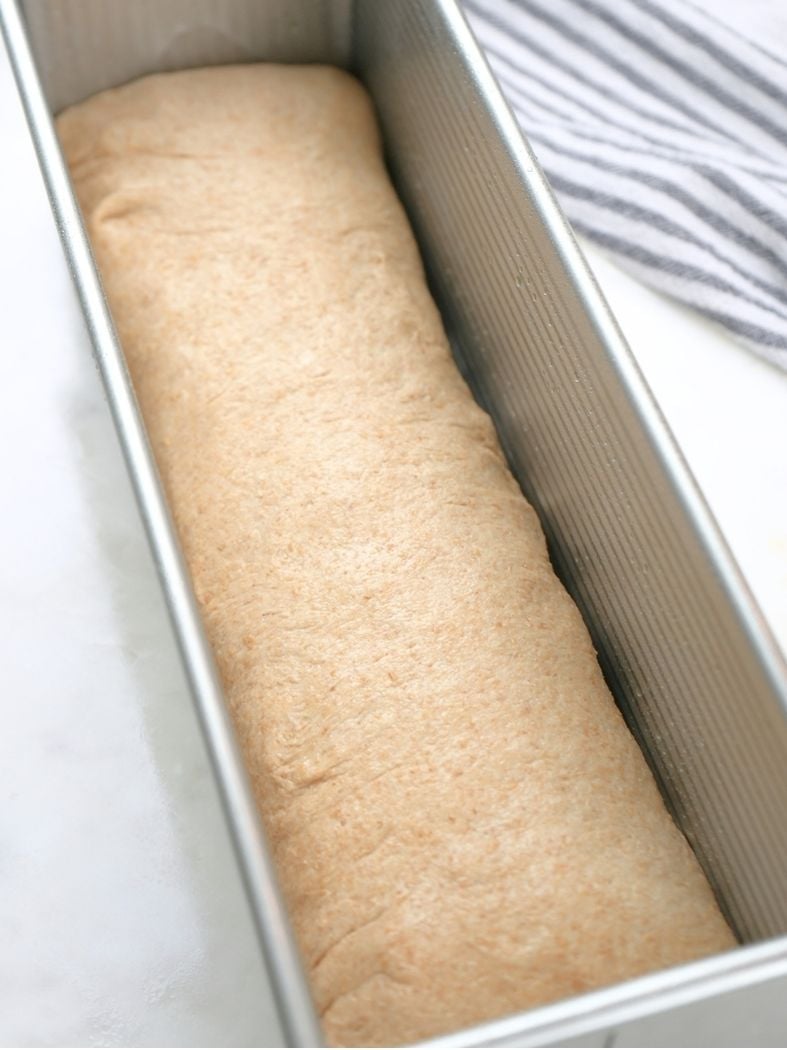
Step 10: Transfer the rolled dough into the prepared Pullman pan. Press the dough gently to ensure it fills the pan to the edges.
Cover with a damp towel and let it proof until it is about 1″ from the top of the pan. You can use a proofing box to speed this up.
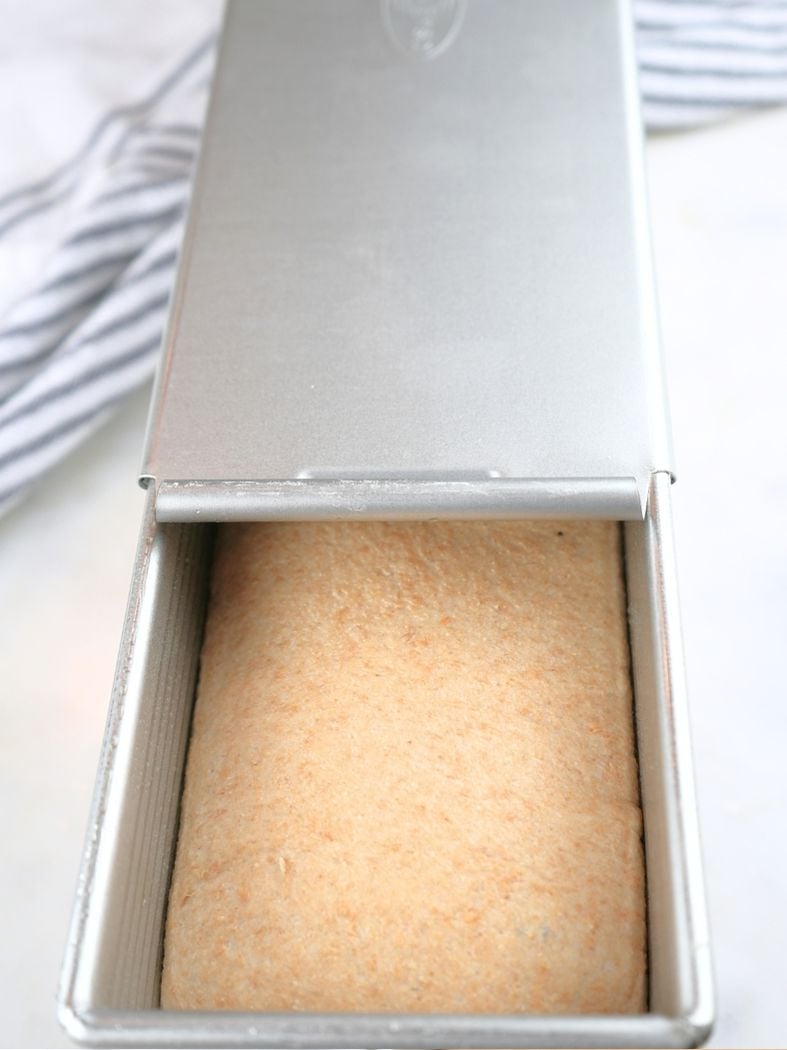
Step 11: Once the dough has proofed, preheat the oven to 375° F. Grease the lid, then place it on the pan.
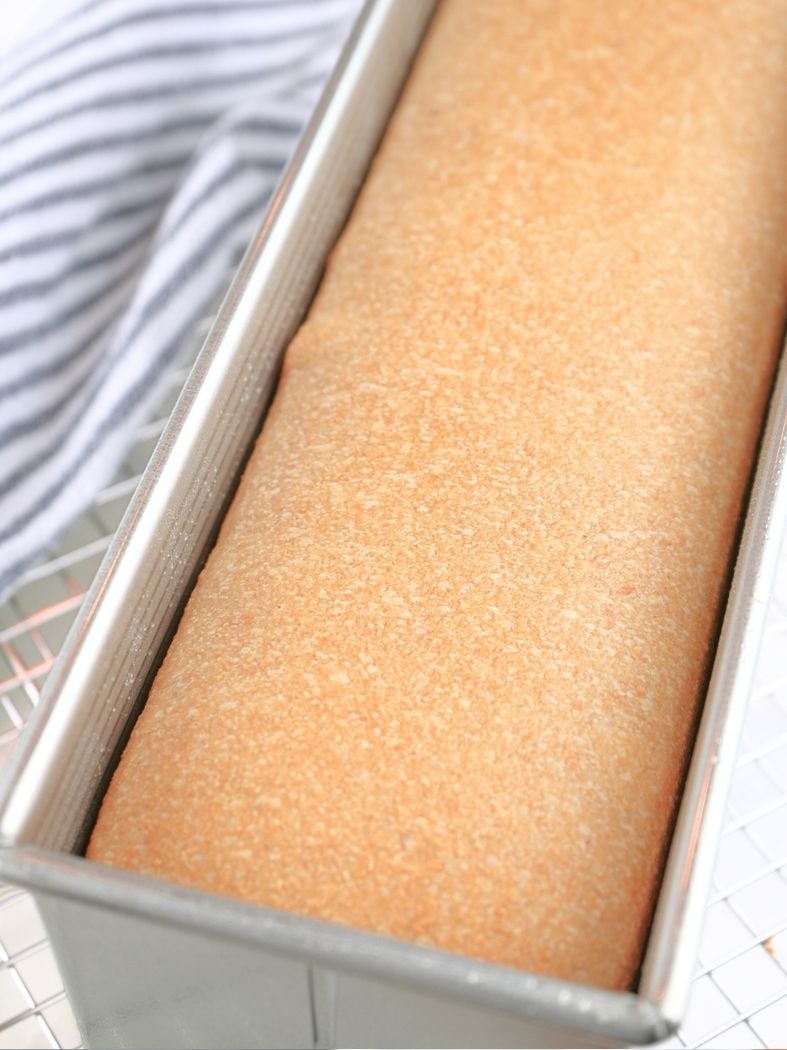
Step 12: Bake with the lid on for 50-55 minutes or until the internal temperature reaches 200° F.

Step 13: Remove from the oven, take off the lid. Let it cool in the pan for a few minutes. Then, transfer to a wire rack.
Allow to cool to room temperature before slicing and serving.
Tips for Success
- I always keep a small bag of fresh-milled hard wheat in the freezer. That way, if I need to add a little to my dough, it’s ready.
- I recommend weighing ingredients in grams for the most accurate and consistent results. Measuring by volume can vary since flour settles differently each time, and every mill grinds differently.
- Fresh-milled flour absorbs water slowly, so it is critical to let it rest (aka autolyze). I often skip this step for regular flour, but I never skip it for fresh-milled.
- Grains vary based on the type and growing conditions, so you may need more or less water. Adjust as you go, adding extra flour or water as needed.
- Working with fresh-milled flour is a bit different from store-bought, but the same qualities of "good" dough still apply. It may feel more textured from the bran and germ, and it might be slightly less elastic, but it should still be smooth, stretchy, and able to pass the windowpane test.
- With fresh-milled flour, the bran and germ can cause the dough to tear sooner during the windowpane test, but you should still see light pass through it.
Troubleshooting Common Issues
Dense: Dense bread often means there was not enough hydration in the dough or that there wasn’t enough gluten development. Make sure your dough is slightly tacky, smooth, elastic, and that it passes the windowpane test.
Gummy: Gummy bread is almost always the result of underfermented dough. Make sure the dough has doubled and is domed on top. Also, cutting the bread before it has cooled completely can cause a gummy texture.
Uneven: This is usually a shaping issue. Make sure you roll the dough tightly to create tension. Also, using a pan that is too large or too small can affect the height and shape.
Check out my Fresh-Milled Flour Q&A for more troubleshooting tips!
Serving Suggestions
Sandwiches: This is a great sandwich bread. I like to make chicken salad sandwiches with roast chicken. And of course, you can’t go wrong with a turkey sandwich!
Breakfast: Use sourdough pullman bread for a delcious whole grain French toast.
Toast: Slather your sourdough toast with homemade strawberry jam. Or you can top it with a little homemade mayo and canned pinto beans (one of my personal faves for breakfast!).
Breadcrumbs: If you have more bread than you can get through in time, you can use it to make sourdough breadcrumbs.

Storing and Freezing
- Wait until the bread is completely cool before storing.
- Bread made with fresh-milled flour molds more quickly than store-bought. So I often pre-slice and freeze it to extend its shelf life.
- If storing at room temperature, keep your bread in an airtight container or bread bag for up to 2 days.
- You can store homemade sourdough pullman bread in an airtight container in the fridge for 3-4 days to extend its shelf life, but it may dry out a little.
Sample Baker’s Schedule
For more tips on fitting sourdough into your schedule with less stress, check out my post on Sourdough for Busy Moms.
The Night Before Baking
9:00 PM: Feed sourdough starter.
The Next Day
7:00 AM: Mill flour and mix the dough using the paddle attachment. Set aside to autolyze.
7:30 AM: Switch to the dough hook and knead the dough. Cover and bulk ferment.
12:30 PM: Shape the dough and place it in a loaf pan to proof.
5:00 PM: Bake the bread.
6:00 PM: Cool the bread, slice, and enjoy!
FAQs
Yes. You can bake this dough in a standard loaf pan, but the shape and crust will be different. Without the lid, expect a domed top and a slightly darker, thicker crust.
Also, this recipe is for a 13″ Pullman pan, so your bread may be very tall if baked in a standard loaf pan (though it will still be delicious).
You can, but the flavor and texture will be different. Store-bought flour is usually older and may not contain as much bran and germ. As such, it may absorb water differently, so adjust hydration as needed.
This can happen if the dough was over-proofed, if there wasn't enough gluten development, or if it was underbaked.
Yes. Simply halve all the ingredients and use a smaller loaf pan for best results. Adjust baking time as needed, checking for doneness early.
Let's Connect!
If you tried this recipe and loved it, leave a comment or review below.
Also, don't forget to pin this post and follow Moon + Magnolia on Pinterest. You can save all my recipes on your boards and keep up with the latest happenings!
Share your creations on Instagram and tag @moon_and_magnolia!

Fresh-Milled Sourdough Pullman Loaf (Pain De Mie)
Equipment
- Grain Mill
Ingredients
- 370 g hard white wheat berries, 2 cups wheat berries
- 160 g kamut wheat berries, just over 3/4 cups wheat berries
- 20 g vital wheat gluten
- 10 g sunflower lecithin
- 375 g water
- 115 g sourdough starter
- 58 g unsalted butter, softened and cubed
- 30 g honey
- 11 g salt
Instructions
- Mill the Wheat Berries. Just before prepping the dough, mill the hard white wheat and kamut on the finest setting. (If you are measuring in volume, you should have about 4 1/3 cups total flour after milling.)370 g hard white wheat berries, 160 g kamut wheat berries
- Add the Ingredients (except salt). In the bowl of a stand mixer, add the freshly milled flour, vital wheat gluten, sunflower lecithin, water, sourdough starter, butter, and honey (do not add the salt yet).20 g (2 tablespoons) vital wheat gluten, 10 g (1 tablespoon) sunflower lecithin, 375 g (1 1/2 cups) water, 115 g (1/2 cup) sourdough starter, 58 g (1/4 cup) unsalted butter, 30 g (1 1/2 tablespoons) honey
- Mix and Rest. Using a paddle attachment, mix the ingredients together on low. Mix until just combined. Cover with a towel and allow the dough to rest (aka autolyze) for 30 minutes to 1 hour. The dough may seem too wet at this point. But the autolyzing will allow the flour to hydrate fully, so don't add extra flour.
- Add the Salt and Begin to Knead. Add the salt. Then, switch to the dough hook and knead on low until the dough forms a cohesive ball.If it is still sticky, add 1 tablespoon at a time of fresh-milled flour (hard white or kamut) until slightly tacky but not clinging to your hands. I usually need 2-3 tablespoons.Keep the mixer at or below KitchenAid speed 3 for best results.11 g (2 teaspoons) salt
- Continue Kneading. Once the dough is the right consistency, knead it until it is smooth, elastic, and passes the windowpane test. This usually takes me about 10 minutes.
- Bulk Ferment. Transfer the dough to an oiled bowl. Cover with a damp towel and allow it to bulk ferment until it has doubled in size and is domed on top. This usually takes 3-5 hours at 75°F. The warmer the room, the faster it will ferment. The cooler, the slower it will ferment. Watch the dough, not the clock.
- Prep the Pan and Dough. Butter or grease a 13" Pullman loaf pan. Then, turn the dough out onto a clean work surface.
- Shape the Dough. Gently stretch the dough into a 13" rectangle-ish shape.
- Roll the Dough. Starting with the long edge of the dough closest to you, roll the dough into a tight log. To do this, tuck and pull back on the dough as you roll to create tension. Then, pinch the seams together.
- Proof. Transfer the rolled dough into the prepared Pullman pan. Press the dough gently to ensure it fills the pan to the edges. Cover with a damp towel and let it proof until it is about 1" from the top of the pan. You can use a proofing box to speed this up.
- Preheat and Cover. Once the dough has proofed, preheat the oven to 375° F. Grease the lid, then place the it on the pan.
- Bake. Bake with the lid on for 50-55 minutes or until the internal temperature reaches 200° F.
- Cool and Enjoy! Remove from the oven, take off the lid. Let it cool in the pan for a few minutes. Then, transfer to a wire rack. Allow to cool to room temperature before slicing and serving.
Notes
- I always keep a small bag of fresh-milled hard wheat in the freezer. That way, if I need to add a little to my dough, it’s ready.
- I recommend weighing ingredients in grams for the most accurate and consistent results. Measuring by volume can vary since flour settles differently each time, and every mill grinds differently.
- Fresh-milled flour absorbs water slowly, so it is critical to let it rest (aka autolyze). I often skip this step for regular flour, but I never skip it for fresh-milled.
- Grains vary based on the type and growing conditions, so you may need more or less water. Adjust as you go, adding extra flour or water as needed.
- Working with fresh-milled flour is a bit different from store-bought, but the same qualities of "good" dough still apply. It may feel more textured from the bran and germ, and it might be slightly less elastic, but it should still be smooth, stretchy, and able to pass the windowpane test.
- With fresh-milled flour, the bran and germ can cause the dough to tear sooner during the windowpane test, but you should still see light pass through it.
Nutrition
Nutrition information is auto-calculated and may not reflect your final product. Please verify independently if needed.


Can I omit the honey without adjusting the recipe or affecting the outcome of the loaf?
You can, but you might need to add a touch more water to adjust the hydration. 🙂
-Rebecca
How would I edit for 9x4x4 Pullman smaller pan? Thanks
We love this bread! It’s our go-to sandwich bread with fresh-milled flour.
Well- my first loaf is in the oven and if it doesn’t turn out good it is my own fault as I let it rise well over the top of the pan and there is no getting the lid on to bake. BUT I have to say – your instructions were so easy to follow- the dough was a dream to work with and if this one doesn’t turn out I’ll have another go at it soon😊
I’m so glad the instructions were easy to follow! I’ve let my dough overproof many times. It’s par for the course some days. 😊
-Rebecca
I’m eager to make the recipe but I don’t have a large Pullman pan. I have 4 small USA Pullman pans. Is there a formula for how to increase the recipe so we could make 2 (or 4) smaller loaves? Thanks for the tip about sunflower lecithin! Cathy
Hey there!
What size are the small pans?
-Rebecca
What can I use instead of sunflower lecithin. So expensive thanks
Hey there! You can actually leave the sunflower lecithin out if you want, but it might change the texture a bit. You could experiment with increasing the hydration a little in lieu of the sunflower lecithin. But I usually find this dough to be on the wetter side already. If you want to try a FMF sourdough loaf without sunflower lecithin or vital wheat gluten, I also have this one: https://moonandmagnolia.com/fresh-milled-sourdough-sandwich-bread/.
Hope that helps!
-Rebecca
is there a flour instead of the Kamut berries that I can use?
You can use any hard wheat for this recipe. If you want to stick with just one wheat berry, I would use 100% hard white wheat. I use a small amount of kamut because it mellows out the flavor a little, but it isn’t necessary. 😊
-Rebecca
The addition of vital wheat gluten and sunflower lecithin makes this bread really soft, and it’s one of the only fresh-milled breads that appeases all of the taste buds in my home.