This post may contain affiliate links. Please read our disclosure policy.
Learn how to make sourdough starter from scratch. All you need is flour, water, and a little patience. With this easy-to-follow routine, you’ll soon be on your way to enjoying the simple pleasures of baking sourdough bread.

Years ago, when I started making sourdough bread, it seemed like such a mystery.
I didn’t understand how sourdough starter works, and I really didn’t understand what “sourdough discard” is.
Since then, I’ve learned that sourdough is, yes, a science and an art-but it isn’t a mystery. Really, sourdough is an easy (and delicious) way to reclaim simplicity in your home and weekly routine.
To make sourdough bread, the first step in the process is to establish your own starter.
If you landed on this post, you probably feel like I did when I first started making sourdough: confused and unsure of what a sourdough starter is, and how to make and use one.
And this is where some folks pump the brakes on their sourdough dreams. But before you come to a screeching halt, stay with me. I’ll walk you through each step of making a sourdough starter.
Within 7-14 days (yes, it does take some time), you will be ready to start the next step of your sourdough journey and enjoy the simple pleasures of baking homemade bread with wild yeast…that you cultivated!

What Is a Sourdough Starter?
Sourdough starter is a fermented combination of flour and water used in place of commercial yeast. In simple terms, a sourdough starter leavens dough.
As the grains ferment, the wild yeast produces carbon dioxide (aka bubbles). These bubbles eventually make your bread rise.
But more than that, I also believe that sourdough starter is a vital ingredient when it comes to scratch cooking.
Not only do I bake sourdough bread for my family every week, but I also use the starter for flatbreads, homemade donuts, sourdough Cinnamon Toast Crunch, and more.
Truly, sourdough starter has changed the way I think about cooking meals and feeding my family.
Video – Sourdough Starter Tutorial

Why You’ll Love Keeping Starter Around
Fermented Grains: The natural yeasts and bacteria in sourdough starter premetabolize the grains, making them easier for our bodies to digest.
Versatile Ingredient: Sourdough starter can be used for recipes like sourdough sandwich bread, Pop Tarts, and lemon bars.
Heirloom Skill: Making your own sourdough starter and sourdough bread are heirloom skills that foster a sense of connectedness and creativity in our lives.
Simple Pleasure: My weekly sourdough routine is an uncomplicated way to reconnect with joy in my home. There is nothing like taking a bite of homemade sourdough. It’s joyful every. single. time.

Ingredients
Whole Wheat Flour: I prefer whole wheat flour. I’ve had great results with both King Arthur whole wheat and Pillsbury. Rye flour will also work. The type of flour you feed your starter during the first few days matters, so stick with whole wheat or rye.
All-Purpose Flour: I use Costco organic all-purpose flour. But any brand of flour should work. For the best results, I recommend using unbleached all-purpose for Days 3-end.
Water: I’ve used filtered water from my fridge for years, and it has worked great. Some sourdough bakers claim tap water makes their starter sluggish, but I have not experienced this firsthand. Make sure the water is cool or room temperature.
Tools You Will Need
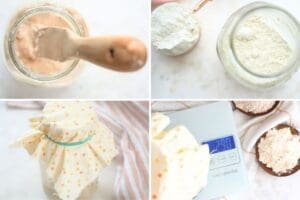
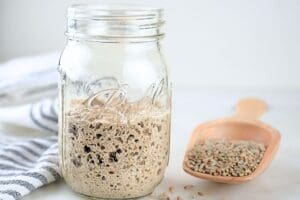
Jars: I use Mason jars to store my sourdough starter.
Cotton Cloth: I cover my starter with a square of 100% cotton and secure it with a rubber band.
Rubber Bands: Grab a few rubber bands: one for securing the cloth lid and one for placing around the jar to mark the starting point (this is an easy way to tell if your starter is doubling).
Kitchen Scale: Using a kitchen scale ensures a precise 1:1 ratio of starter, flour, and water.
Measuring Cups: If you don’t have a kitchen scale, I included the cup measurements in the printable recipe card below.
Spurtle: A spurtle makes stirring thick starter easy. Of course, you can always use a spoon.
Step-by-Step Instructions

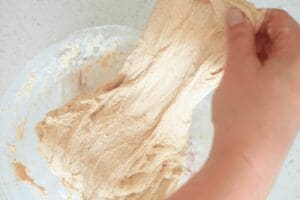
Day 1: In a clean jar, combine 113 g whole wheat flour and 113 g water (1 cup flour, ½ cup water). Stir until smooth and thick, like pancake batter.
Cover loosely with a cloth or lid and let sit at room temperature for 24 hours.

Day 2: By Day 2, you may or may not see bubbles. Measure 113 g of starter into a clean jar and discard the rest.
Add 113 g flour and 113 g water, then mix well. Cover and rest at room temperature for 24 hours.
It's normal for a new starter to rise quickly at first and then slow down. This early doubling is just the yeast and bacteria stabilizing. Continue feeding as directed, even if it doubles now.

Days 3-End: Measure 113 g of starter into a clean jar and discard the rest. Add 57 g whole wheat flour, 56 g all-purpose flour (113 g total), and 113 g water.
Mix thoroughly, cover, and let sit for 12 hours.
After 12 hours, repeat the same process using half whole wheat and half all-purpose flour.
Continue feeding every 12 hours until the starter consistently bubbles, doubles in size, and smells like sourdough. This process usually takes 5-10 days or longer, depending on conditions.
Tips for Success
- After each feeding, you can mark where your starter began by placing a rubber band on the jar at the same height as your starter. That way, you'll be able to tell if it is doubling.
- The lid should not be tight. The bacteria and yeast’s off-gassing creates pressure that can shatter the glass if there isn't breathing room. Use 100% cotton secured with a rubber band or a loose-fitting lid.
- The 1:1:1 ratio referenced in the sourdough world always refers to grams. So, I recommend using a kitchen scale for a precise 1:1:1 ratio.
- The warmer the spot, the more active the yeast and bacteria will be. Try to keep your starter in a spot that is 70°-80° F. If you don’t have a warm spot, a proofing box can help.
How To Tell When It’s Ready
You can start using your sourdough starter once it is regularly doubling in size after each feeding.
When I was making my starter, I wanted to use it so badly. It’s exciting and fun to create a wild yeast culture, but the results will be disappointing if you try to use it too soon.
It does take a little time to make a sourdough starter, but it’s worth the wait!

What To Do with Your Established Starter
Once your starter is regularly doubling, it’s time to start baking!
When you are ready to try your hand at a sourdough bread recipe, use the amount of starter called for in the recipe.
But don’t forget to leave some in the jar to save as your “master starter.” What’s left in the jar is what you will feed and maintain for future baking.

Storing in the Fridge
For most home bakers, I recommend storing your sourdough starter in the fridge. This is the most hands-off way of maintaining a healthy sourdough starter.
The low temperature of the refrigerator slows down the fermentation process, so you do not need to feed it as often.
- Take your sourdough starter out of the fridge and discard half.
- Transfer the remaining starter into a clean jar.
- Feed it equal parts (1:1:1 ratio). So if you have 50 grams of starter, feed it 50 grams of flour and 50 grams of water.
- Bake or store.
- If you plan on baking, allow your starter to sit in a warm spot until doubled. Then, bake as usual.
- If your starter is headed back into hibernation, immediately put it in the fridge.
Storing on the Counter
I keep my starter on the counter during busy baking seasons, like the holidays, because I use it daily.
This route, though easy, requires daily attention. Additionally, depending on how much starter you use each day, it can accumulate an excessive amount of discard.
- Store your starter at room temperature or in a warm spot, and cover it with a loose-fitting or breathable cloth lid.
- When it is time to feed your starter, discard half.
- Feed the remainder or the “master starter” with equal parts flour and water. So if you have 50 grams of starter, feed it 50 grams of flour and 50 grams of water.
- Repeat every 24 hours. Note: To stay active, your starter should be placed in a location with a temperature of 70-80 degrees F.
Video – My Once-a-Week Starter Routine

FAQs
At some point, your starter might smell a little funky. That's totally normal and just means the yeast and bacteria are doing their job. If the odor lingers more than a few days, try feeding it with 113 g of whole wheat flour for a few feedings.
If your starter doesn't double after Day 7, you can switch back to feeding it 113 grams of whole wheat. Whole wheat’s microbiome can give it a boost.
Keep feeding it! It is normal for a new starter to double really quickly and then slow down. That initial doubling is just a big influx of yeast and bacteria that’s working itself out and stabilizing.
Whole wheat flour (and rye) is less processed and contains the entirety of the wheat kernel. As such, it has more nutrients and microbes that encourage fermentation.
That is called "hooch," and it’s a tell-tale sign that your starter is hungry. In short, it is alcohol, a by-product of fermentation. Either stir it back into the starter or pour it off. Then, feed as usual.
No, if you feed the discard, you are simply creating more starter. As its name implies, discard should be thrown away or reserved for discard recipes, such as sourdough pie crust or sourdough discard zucchini bread.
Keep in mind, though, that discard should not be consumed until your starter is fully established (10-14 days).
Sourdough starter is surprisingly resilient. If you forgot to feed it, just discard and resume your regular feeding schedule.
Once your starter is established, you can cook and bake with discard. Until then, while the bacteria and yeast work themselves out, throw it in the trash (not down the sink).
Mold is always a no-go. Unfortunately, if you see mold, you will have to throw away your starter and go back to the drawing board.
Let's Connect!
If you tried this recipe and loved it, leave a comment or review below.
Also, don't forget to pin this post and follow Moon + Magnolia on Pinterest. You can save all my recipes on your boards and keep up with the latest happenings!
Share your creations on Instagram and tag @moon_and_magnolia
More Sourdough Tutorials


Beginner Sourdough Starter Recipe
Ingredients
To Begin Your Starter (Day 1 & 2)
- 113 g whole wheat flour
- 113 g water, room temperature
To Feed Your Starter (Days 3-end)
- 57 g whole wheat flour
- 56 g all-purpose flour, unbleached
- 113 g water, room temperature
Instructions
Day 1
- In a clean jar, combine 113 g whole wheat flour and 113 g water (1 cup flour, ½ cup water). Stir until smooth and thick, like pancake batter.Cover loosely with a cloth or lid and let sit at room temperature for 24 hours.113 g (1 cup) whole wheat flour, 113 g (1/2 cup) water, room temperature
Day 2
- By Day 2, you may or may not see bubbles. Measure 113 g of starter into a clean jar and discard the rest.Add 113 g flour and 113 g water, then mix well. Cover and rest at room temperature for 24 hours.It’s normal for a new starter to rise quickly at first and then slow down. This early doubling is just the yeast and bacteria stabilizing. Continue feeding as directed, even if it doubles now.
Day 3-End
- Measure 113 g of starter into a clean jar and discard the rest. Add 57 g whole wheat flour, 56 g all-purpose flour (113 g total), and 113 g water.Mix thoroughly, cover, and let sit for 12 hours.After 12 hours, repeat the same process using half whole wheat and half all-purpose flour.Continue feeding every 12 hours until the starter consistently bubbles, doubles in size, and smells like sourdough. This process usually takes 5–10 days or longer, depending on conditions.57 g (1/2 cup) whole wheat flour, 56 g (1/2 cup) all-purpose flour, unbleached, 113 g (1/2 cup) water, room temperature
What To Do with Your Established Starter
- Once your starter is regularly doubling, it's time to start baking! When you are ready to bake, use the amount of starter called for in the recipe. Don't forget to leave some in the jar to save as your "master starter." What's left in the jar is what you will feed and maintain for future baking.
How To Store & Maintain Your Starter
- For weekly/occasional baking, store your starter in the fridge and feed it weekly. For daily baking, keep your starter on the counter and feed it every 24 hours.
Video
Notes
- After each feeding, you can mark where your starter began by placing a rubber band on the jar at the same height as your starter. That way, you'll be able to tell if it is doubling.
- The lid should not be tight. The bacteria and yeast’s off-gassing creates pressure that can shatter the glass if there isn't breathing room. Use 100% cotton secured with a rubber band or a loose-fitting lid.
- Mold is always a no-go. Unfortunately, if you see mold, you will have to throw away your starter and go back to the drawing board.
- Once your starter is established, you can cook and bake with the discard. Until then, while the bacteria and yeast work themselves out, throw the discard in the trash (not down the sink).
- Sourdough starter is surprisingly resilient. If you forget to feed it, discard it and resume your regular feeding schedule.
Nutrition
Nutrition information is auto-calculated and may not reflect your final product. Please verify independently if needed.

Hi Rebecca,
Have you had any good luck using freshly milled spelt for your starter? Also, would spelt make a good sourdough? I’m totally new to this process.
Thanks!
Hey there!
I haven’t used spelt specifically. But I do have a fresh-milled flour starter recipe that will work with any fresh-milled wheat. You can check it out here: https://moonandmagnolia.com/fresh-milled-flour-sourdough-starter/. And here is the accompanying YouTube video: https://youtu.be/5Yu_vvhMTKg.
Hope those help!
-Rebecca
I’ve been using the starter I made with this instructions for many years!
Do you add yeast at any time during this process?
No, the fermentation process cultivates wild yeast. You would then use the starter in place of commercial yeast. 🙂
-Rebecca
Hi! I love your website, it’s so easy to follow and full of great tips. I noticed you mentioned using a clean jar when feeding your starter. Do you do this every time you feed it? I’ve had success making sourdough starter before, but this time I noticed mold on the sides of the jar and had to throw it out. If I’m using the same jar, should I be wiping down the excess on the sides to help prevent that from happening again?
Hey there!
I don’t always use a clean jar, but I do often do. I usually don’t go more than 2 or 3 feedings in the same jar. I haven’t experienced mold growing in my starter before, but I’ve always had a hunch that the old stuff on the sides of the jar could increase the chances. Since your starter had some mold it in it, next time, I’d switch to a clean jar after every feeding. And I’d also scrape the sides.
Hope that helps!
-Rebecca
Hi Rebecca,
I am a bit confused and would like clarification on the starter. You say to throw half away and add 113g of flour and 113 of water. On day 8 of your video, your starter looks like it has more than double; do you throw out half (which seems to be more than 113g)or just transfer 113g to a clean jar and throw the rest away?
Also, you are using whole wheat and all purpose flour for your starter. I only want to use fresh milled flour. Should I use hard wheat, soft wheat or any other grain like kamut or spelt. I would like to hear your suggestions and opinion.
Your help is greatly appreciated.
Hey there!
So “half” is always by weight. So even if it has more than doubled in size, I’d still transfer 113g to a clear jar and discard the rest. You can use any freshly milled wheat for your starter. I’ve had good luck with rye, einkorn, hard red, and hard white. I have the instructions and tips for a fresh-milled starter in this post: https://moonandmagnolia.com/fresh-milled-flour-sourdough-starter/ and a full video tutorial for a fresh-milled starter here: https://youtu.be/5Yu_vvhMTKg.
Also, I have an einkorn starter recipe/post coming out next week, so that might be helpful, too. I used fresh-milled einkorn for it. 🙂
Hope that helps!