This post may contain affiliate links. Any purchases from links outside of moon + magnolia may earn a commission at no additional cost to you. Thank you for supporting my content!
Canning pinto beans is a simple way to stock your pantry with wholesome, ready-to-use food. It's easy to do, and once you've made a batch, you'll have convenient, home-cooked food on hand for months to come.
This is a tested recipe from the National Center for Home Food Preservation and requires pressure canning (don’t worry, I’ll help you along the way!).

In my recent YouTube video about building a self-sufficient pantry, I shared how having the right ingredients on hand makes it easy to throw together quick, scratch-made meals.
But a well-stocked pantry doesn't have to be bursting at the seams. Instead, it just needs to hold the foods you actually use-the ones that make life easier, not more stressful.
Canned beans are often my go-to. But store-bought ones are usually too salty, and the can liners contain things I’d rather avoid feeding my family.
So I've started canning pinto beans at home, and it’s been a total game changer.
It takes a little work up front, but once you've canned a few batches, you've got homemade, ready-to-eat food for months.
I add home-canned pinto beans to veggie soup, burritos with candied jalapeños, or in a simple bean soup with homemade sauerkraut.
And call me crazy, but one of my all-time favorite breakfasts is bean toast. It’s just sourdough toast smeared with a little homemade mayo and piled high with pinto beans.
If you are new to food preservation, pressuring canning can seem intimidating. But it is actually really easy and empowering. Before you get started, make sure you review the instruction manual for your pressure cooker.
And then…let’s can some beans!

About This Recipe
This recipe follows the National Center for Home Food Preservation’s instructions for canning beans.
Though the recipe is the same, this blog post explains the process in more detail so you can feel confident canning pinto beans.
Why Can Your Own Pinto Beans?
Saves Time: While it takes time upfront, once the beans are canned, they're ready to use, so you don't have to cook them from dry each time.
Frugal: A pound of dry beans costs about a dollar (or less if you buy in bulk) and makes several cans’ worth. Store-bought cans run $1-$2 per can, so canning your own is an easy way to save money and stock your pantry.
No Added Ingredients: When you can your own pinto beans, you know exactly what is going into them: no preservatives or artificial ingredients. And there are no weird chemicals from the plastic can lining.
Well-Stocked Pantry: Making your own pantry staples is an easy way to stock a well-rounded, reliable pantry. If scratch-made pantry staples are your vibe, I also recommend making freeze-dried mashed potatoes.
Delicious: Home-canned beans taste so much better than store-bought. They have more flavor, and you can add salt or make them sodium-free.
Pressure Canning Basics
If you are new to pressure canning, it can initially seem a little intimidating. But I’m totally confident that you can successfully pressure can pinto beans!
Whether to pressure or water bath can depends on the food’s acidity. High-acid foods are water-bath canned, while low-acid foods are pressure canned.
Pinto beans are a low-acid food, meaning they need the high heat of pressure canning to kill bacteria like botulism.
A pressure canner gets much hotter than a water bath canner-somewhere between 240°-250° F-making it the only safe option for canning low-acid foods like pinto beans.
Before starting, familiarize yourself with pressure canning basics from trusted sources such as Ball Canning and the National Center for Home Food Preservation.
For specific instructions for your pressure canner, refer to the manufacturer’s user manual.
Ingredients

Pinto Beans: Any dry pinto beans will work. I got a great deal on a 12-pound bag of dry pinto beans at Sam’s Club.
Water: You’ll need a few quarts of water for soaking and cooking the beans.
Salt: Adding salt to the cans is optional. If you opt to add salt, use canning salt to prevent the water from getting cloudy.
Get the full list of ingredients and measurements on the printable recipe card below.
Tools You Will Need
Bowl: You will need a large bowl to soak the beans. I love my Ohio Stoneware 12″ bowl for batch projects like this.
Stock Pot: Use your biggest stock pot for cooking the beans. I used an 8-quart stock pot.
Pressure Canner: You will need a pressure canner (not a pressure cooker) to can pinto beans.
Jars: Use pints or quart jars. The printable recipe card includes instructions for both.
Lids and Rings: I use Ball lids and rings. Make sure you get wide or regular, depending on your jar type. Remember, rings can be reused, but lids are not reusable.
Canning Tools: You will also need a debubbler and a set of canning tongs. I also like using a regulator, which helps maintain consistent pressure.
Step-by-Step Canning Pinto Beans

Step 1: Either overnight or quick soak the beans.
Overnight Soak: Place the pinto beans in a large bowl and cover with water by 2-3 inches. Make sure your bowl is big enough for the beans to expand. Allow them to soak for 12-18 hours.
Quick Soak: Bring a pot of water to a boil. Then, pour the boiling water over the beans in a separate pot. Turn on the burner and boil the beans for 2 minutes. Remove from heat and set aside to soak for 1 hour.

Step 2: Drain the soaked beans and rinse them with clean water.

Step 3: Place the soaked beans in a large stock pot and cover them with water, at least 2 inches above the beans.

Step 4: Boil the beans for 30 minutes. Start the 30-minute timer once the beans come to a full boil.
Don’t drain the beans after this step. The cooking liquid is needed for canning.

Step 5: Meanwhile, prepare your canner and jars according to the manufacturer’s instructions.
Since this is a hot pack, I recommend keeping the jars warm inside the canner while you prep it.
The canner should be just below a boil when you add the jars.

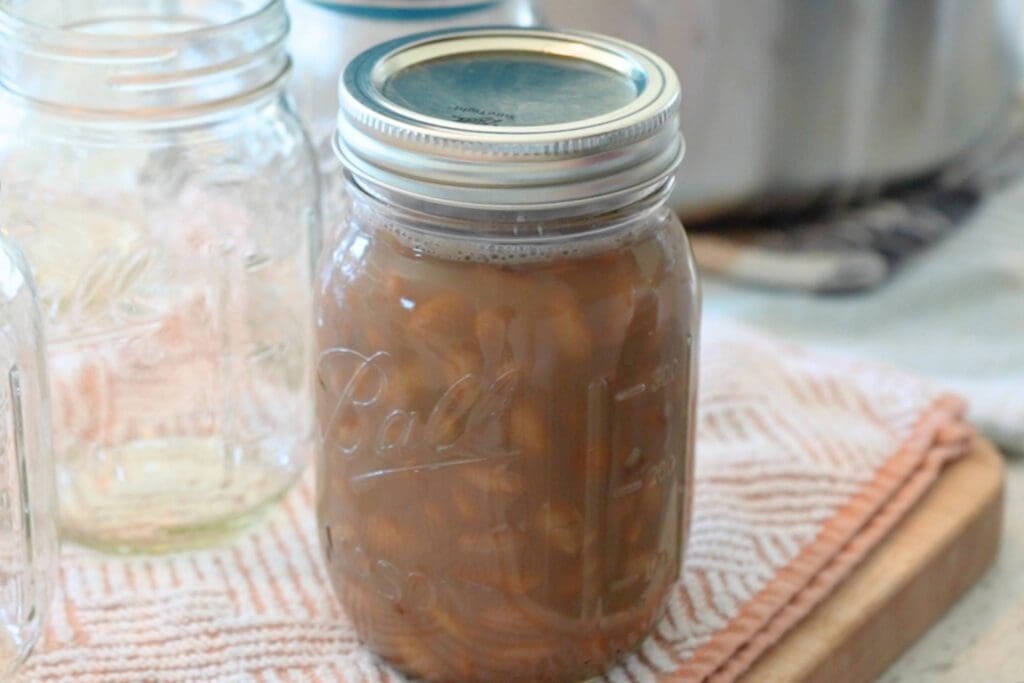
Step 6: Ladle the hot beans into the hot jars about 2/3 full, then top them off with the cooking liquid, leaving 1″ of headspace. Optional: Add 1/2 teaspoon of canning salt per pint or 1 teaspoon per quart.
The beans will absorb much of the liquid, so you want a higher water-to-bean ratio.
If you don’t have enough cooking liquid, you can also use boiling water.

Step 7: Use a clean debubbler to slide around the jar's edges and release air bubbles. Re-check the headspace and add more liquid if needed.
Step 8: Wipe the jar rim with a clean, damp paper towel. Place a lid on each jar, making sure it is centered. Add a band to each jar and twist it until fingertip tight.

Step 9: Transfer the jars to the pressure canner using canning tongs.

Step 10: Follow the manufacturer’s instructions for sealing and venting your canner.
Most canners will take 15 minutes or so to pressurize and also require 10 minutes of venting before placing the weight.

Step 11: Pressure can for 75 minutes for pints or 90 minutes for quarts. Adjust the pounds of pressure for your elevation.
The chart below details the pressure needed for elevation changes.
Keep an eye on the canner and adjust the heat to maintain the correct pressure (or use a regulator).


Step 12: Let the pressure canner completely depressurize. Once the pressure returns to zero and the vent lock drops, remove the weight and let the canner sit for 10 minutes before opening.
Remove the cans from the pressure canner and allow them to cool undisturbed for 12-24 hours. Take off the ring and check the seal.
Use a damp towel to clean off the outside of the jar before labeling and storing.
Tips for Success
Leftovers: You may have more beans than will fit in the jars. I follow the NCHFP's 3.5-5 lb recommendation, but extras usually end up on the dinner table or in a pot of Cuban garbanzo stew (swap the chickpeas for pinto beans).
Don’t Overboil the Beans: While boiling the beans, keep an eye on them. They tend to overboil, and nobody wants that mess on the stove.
Water-to-Bean Ratio: During pressure canning, the beans will soak up more water than you'd expect. Fill jars about two-thirds full with beans, then top off with the cooking liquid, leaving 1 inch of headspace.
Don’t Can Dry Beans: According to the National Center for Home Food Preservation, it is unsafe to can beans without rehydrating and cooking them first (source).
Season Them Later: Save the herbs and seasonings for when you serve the beans, not when you can them. I like to toss them with homemade herb butter or garnish them with freeze-dried herbs for easy, elevated flavor.

How To Store Home-Canned Pinto Beans
Without the Rings: Store home-canned goods without the rings so you'll know if the seal pops.
Cool and Dry: Store your home-canned goods in a cool, dry place, ideally between 50° F and 70° F.
Do Not Stack: The weight on the bottom jar can make it hard to tell if the seal has popped.
Upright: Keep the jars upright.
Check the Lid Recommendations: Most manufacturers state how long their seals will last. Check the packaging for info.

Safety Tips for Canning Pinto Beans
I always recommend familiarizing yourself with the canning safety tips from The National Center for Home Food Preservation and Ball Canning. Ball's FAQ page answers many common questions about safe canning practices.
Canning food at home is a safe way to preserve your favorite foods, but there are a few tips to remember:
Use a Tested Recipe: Tested recipes undergo a rigorous scientific process to ensure that dangerous microorganisms will not grow in your preserved food. I only use and share National Center for Home Food Preservation and Ball recipes.
Clean Environment: Ensure your food, kitchen, hands, and tools are clean before canning.
Use Unblemished Food: Choose foods without bruises or other blemishes.
Adjust for Altitude: How many pounds of pressure needed for pressure canning pinto beans depends on your altitude. I’ve included a chart in the printable recipe card, but check out this article for more info.
Label and Date: Always label and date your canned foods. Use your oldest canned foods first.
Skip Grandma's Methods: Old-fashioned canning methods are often unsafe. Also, food and soil change over time (fun fact: tomatoes are less acidic now than they were decades ago). So, only use up-to-date tested recipes and canning practices.

FAQs & Troubleshooting
Going over the required PSI isn't a safety issue, but it can overcook your food. Dropping below the required PSI, however, is unsafe. You'll need to bring the canner back up to pressure and restart the processing time.
Sometimes, this is from siphoning, which happens when the pressure drops too quickly. Let the canner fully depressurize and wait 10 minutes after it has depressurized before opening.
Beans also tend to absorb liquid while processing. To avoid this, fill jars only 2/3 full with beans and top off with hot liquid.
If the liquid is below the beans, they're safe to eat (though they may discolor). But if more than half the liquid is gone, put the jar in the fridge and use it within a few days.
When canning, stick to plain beans. You can always season them when you open the jar, but adding extras can affect safety.
That's usually just starch from the beans, and it’s totally normal and safe.
Adding salt-especially non-canning salt, which can contain anti-caking agents-or not rinsing the beans well before cooking them can also contribute to the cloudiness.
If a jar didn’t seal, pop it in the fridge and eat the beans in a few days. If you can’t get to them quickly enough, you can freeze them.
The safest way to double a canning recipe is to make separate, individual batches. This ensures even cooking and proper processing.
If you prepare one large batch, some jars might cool down while waiting for the first round to process, which can lead to underprocessing in the second batch.

Let's Connect!
If you tried this recipe and loved it, leave a comment or review below.
Also, don't forget to pin this post and follow Moon + Magnolia on Pinterest. You can save all my recipes on your boards and keep up with the latest happenings!
Share your creations on Instagram and tag @moon_and_magnolia!


Pressure Canning Pinto Beans
Equipment
- Pint jars (or quarts depending on preference)
- Canning lids and rings
- Canning Tongs (also called jar lifter)
- Regulator (option, but helpful)
Ingredients
- 3.5-5 pounds dry pinto beans, (use 3.5 lbs for a canner of pints or 5 lbs for a canner of quarts)
- water
- canning salt, (optional)
Instructions
- Either overnight or quick soak the beans:Overnight Soak: Place the pinto beans in a large bowl and cover with water by 2-3 inches. Make sure your bowl is big enough for the beans to expand. Allow them to soak for 12-18 hours.Quick Soak: Bring a pot of water to a boil. Then, pour the boiling water over the beans in a separate pot. Turn on the burner and boil the beans for 2 minutes. Remove from heat and set aside to soak for 1 hour.
- Drain the soaked beans and rinse them with clean water.
- Place the soaked beans in a large stock pot and cover them with water, at least 2 inches above the beans.
- Boil the beans for 30 minutes. Start the 30-minute timer once the beans come to a full boil.Don't drain the beans after this step. The cooking liquid is needed for canning.
- Meanwhile, prepare your canner and jars according to the manufacturer's instructions.Since this is a hot pack, I recommend keeping the jars warm inside the canner while you prep it. The canner should be just below a boil when you add the jars.
- Ladle the hot beans into the hot jars about 2/3 full, then top them off with the cooking liquid, leaving 1" of headspace. Optional: Add 1/2 teaspoon of canning salt per pint or 1 teaspoon per quart.The beans will absorb much of the liquid, so you want a higher water-to-bean ratio.If you don't have enough cooking liquid, you can also use boiling water.
- Use a clean debubbler to slide around the jar's edges and release air bubbles. Re-check the headspace and add more liquid if needed.
- Wipe the jar rim with a clean, damp paper towel. Place a lid on each jar, making sure it is centered. Add a band to each jar and twist it until fingertip tight.
- Transfer the jars to the pressure canner using a jar lifter.
- Follow the manufacturer's instructions for sealing and venting your canner. Most canners will take 15 minutes or so to pressurize and also require 10 minutes of venting before placing the weight or setting the dial.
- Pressure can for 75 minutes for pints or 90 minutes for quarts. Adjust the pounds of pressure for your elevation.The chart below details the pressure needed for elevation changes.Keep an eye on the canner and adjust the heat to maintain the correct pressure (or use a regulator).

- Let the pressure canner completely depressurize. Once the pressure returns to zero and the vent lock drops, remove the weight and let the canner sit for 10 minutes before opening.
- Remove the cans from the pressure canner and allow them to cool undisturbed for 12-24 hours. Take off the ring and check the seal. Use a damp towel to clean off the outside of the jar before labeling and storing.

Notes
- Store home-canned goods upright and without the rings so you'll know if the seal pops.
- Store your home-canned goods in a cool, dry place, ideally between 50° F and 70 ° F.
- Do not stack home-canned goods. The weight on the bottom jar can make it hard to tell if the seal has popped.
- Most manufacturers state how long their seals will last. Check the packaging for info.
- You may have more beans than will fit in the jars. I follow the NCHFP's 3.5-5 lb guide, but extras usually end up on the dinner table.
- Beans tend to overboil, which can make a huge mess of the stove. Keep an eye on them and stir frequently.
- According to the National Center for Home Food Preservation, it is not safe to can beans without rehydrating and cooking them first (source).
- Save the herbs and seasonings for when you serve the beans, not when you can them.
Nutrition
Nutrition information is auto-calculated and may not reflect your final product. Please verify independently if needed.


Such an easy way to stock your pantry to healthy, homemade staples!