This post may contain affiliate links. Please read our disclosure policy.
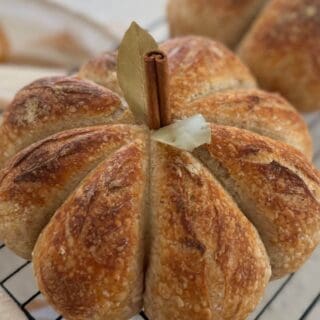
Learn how to make pumpkin-shaped sourdough bread with these simple steps. Making a sourdough pumpkin is easy and adds an aesthetic touch to all your fall and holiday gatherings. Use your favorite sourdough recipe!

When the weather cools, and the sun changes from its bright summer rays to a golden autumn hue, I am ready for all things fall-related.
Every year, we go to the North Carolina mountains to see the changing leaves (the leaves don’t change much here on the coast). While there, we go apple picking and make sourdough apple cinnamon bread with fresh apples from the orchard and sourdough apple cider donuts with fresh cider.
Of course, we also go on pumpkin patch hayrides and enjoy about every pumpkin recipe we can, like sourdough pumpkin cobbler and this pumpkin-shaped sourdough bread.
Learning how to make pumpkin-shaped sourdough is easy as long as you are familiar with making sourdough bread.
I use my classic sourdough bread recipe. However, sourdough boules of any kind work for a pumpkin-shaped loaf. You can even make pumpkin sourdough bread if you have a favorite pumpkin-flavored recipe.
A sourdough pumpkin looks stunning on a fall or Thanksgiving table and tastes delicious, too!

Why You’ll Love Making Pumpkin-Shaped Sourdough
Use Any Bread Recipe: As long as the dough can hold its shape, you can turn it into a pumpkin. Chocolate sourdough, maple oatmeal bread, half-fresh milled, and even sourdough sandwich bread are great choices.
Fall Aesthetic: Pumpkin-shaped sourdough is a pretty and useful way to add a touch of fall to your kitchen.
Easy: Making pumpkin-shaped sourdough is an easy DIY fall project. It’s as simple as tying a few pieces of twine around a batch of dough.
Fun for Kids: This is also an easy project for kids to enjoy. My 3-year-old loves making “bread that’s a pumpkin.”
Simple Gift Giving: Check out my tips below for gifting a sourdough pumpkin throughout the fall holidays.

Tools You Will Need
Banneton Basket: A banneton basket or proofing basket helps maintain the dough’s shape while cold proofing. Use a round banneton basket for pumpkin-shaped sourdough. A towel-lined bowl will also work.
Cutting board: A small cutting board helps turn the dough over without losing the placement of the butcher’s twine.
Butcher’s Twine: Butcher’s twine creates the ribs of the pumpkin shape.
Lame: Score the dough with a lame (pronounced “lahm”) or a regular razor blade.
Cast Iron Dutch Oven: The tight-fitting lid on a Dutch oven holds in the steam and creates a better oven spring. Check out my Dutch oven review on YouTube to learn more about the best ones for baking and cooking.
Cinnamon Stick: A cinnamon stick works perfectly for a cute pumpkin stem.
Bay Leaves: Although they don’t resemble pumpkin leaves, adding a few bay leaves alongside the cinnamon stick stem creates a finished aesthetic.
Step-by-Step Instructions
These instructions assume you have already made, fermented, and cold-proofed your bread dough.

Step 1: Prepare your dough as you normally would. Proof the dough in a round banneton. When you are ready to bake, preheat a cast iron Dutch oven to the temperature the recipe recommends.
Leave the dough in the fridge while you prep the supplies.
Cut 4 pieces of butcher’s twine about 36-40 inches long. Tie them in a knot in the middle. This will keep them in place as you shape the dough.

Step 2: Remove the dough from the fridge, but keep it in the banneton basket or towel-lined bowl.
Place the knotted twine vertically across the top of the dough. Make sure the knot is in the center of the dough.

Step 3: Spread and align the twine so that it creates 8 equal sections.

Step 4: Place a piece of parchment paper over the dough. Make sure the banneton, dough, and string are fully covered.

Step 5: Place a cutting board on top of the parchment-covered banneton basket and use it to turn the dough over.

Step 6: Rub a light coating of flour on the dough. This will make your scoring stand out and help prevent the butcher’s twine from sticking. Note: you can skip this step if you prefer a toasted look rather than a white boule (I skipped this part for the main photo in this post).

Step 7: If needed, readjust the strings so they are even. Then, grab two strings from opposite ends and tie a knot at the center of the dough. The string should be snug against the dough but not cut or pinch into it.
Cut the excess string above the knot.

Step 8: Repeat with each string, ensuring the knots are centered on the dough.

Step 9: Optional: with a bread lame, add designs to each section on top of the loaf.

Step 10: Use the parchment paper to transfer the dough to the hot Dutch oven.
Follow the recipe instructions for baking. Most sourdough bread is ready when the top is golden brown and reaches an internal temperature of 190°-200° F.

Step 11: When the bread is done, transfer it to a wire rack to cool. When it is cool to the touch, remove the string.
I usually cut the strings at the top and pull them out gently. They can get a little embedded in the bread, but give them a little tug, and they should come out.
Use a small knife to pop a hole in the center of the dough, and insert half of a cinnamon stick for the stem. Add bay leaves for a cute finishing touch.
Tips for Success
- Soaking the butcher’s twine in oil can make removing it easier. I usually skip this step, but it is helpful if you find it hard to remove the twine.
- Before arranging the twine across the dough, knot it together in the middle. This makes it much easier to turn the dough over without losing the twine’s placement.
- The baking process isn’t complete until the bread is room temperature. So don’t remove the string or cut into the bread until it is cool to the touch. Waiting to eat it is the hardest part of the process, haha!
- An active starter will ferment the dough faster. If you aren’t in a hurry, an inactive starter will work; it just takes longer. Check out my baking with active vs. inactive starter video on YouTube to learn more.
- Baking sourdough while it’s cold creates more steam, resulting in a fuller loaf of bread. Sourdough can expand up to 30% in the oven! So, oven spring is the difference between a flat sourdough pumpkin and one with a plump, round shape.
- In the same vein as above, a Dutch oven holds the steam to create a better oven spring.
- Though it looks like just a few pieces of string, you specifically need butcher’s twine because it is food- and oven-safe.

Storing & Freezing
Leftover rustic sourdough is best stored with a little airflow. I like to use a kitchen towel and leave it on the counter for up to 2 days. You can also store sourdough bread in a ziplock bag, but it can make the crust soft.
If you think your bread will go stale, you can freeze sourdough bread for later use.
Sourdough bread is best consumed quickly. If you have bread that is drying out, make French toast, sourdough toast, or breadcrumbs with it before it goes stale.

How to Gift a Sourdough Pumpkin
I’m a fan of handmade and useful gifts. Homemade sourdough bread is a gift that just about anyone will enjoy. It is made with your hands and love, and of course, it is delicious.
Here are a few tips for gifting sourdough pumpkins:
- Batch Prep the Dough: If you plan on gifting a few pumpkins, batch prep the dough so you only have to make it once. You can store sourdough dough in the fridge for up to 3 days, allowing you to bake it at your convenience.
- Don’t Bake Too Far in Advance: Sourdough is best eaten within a day or so. Try to plan your baking schedule so you bake the day of or the day before gifting a sourdough pumpkin.
- Make Smaller Pumpkins: Don’t feel like you have to make a giant boule for every gift. Reduce the size of the pumpkin boules and make 3 or 4 out of one batch of dough.
- Use a Cake Box: Put the sourdough pumpkin in a kraft cake box (affiliate link) and attach fall decorations like fake leaves and fall-colored ribbon to the box. Cake and pastry boxes come in many sizes. Make sure the box is the right size for your bread.

FAQs
For the best results, I shoot for about 8-10 score marks per section of the pumpkin. And I only cut about 1/8″ deep into the dough.
If your dough is bursting open, that is a sign that your dough needed to ferment longer or that you scored too deeply. Check out my troubleshooting section below for remedying sourdough that bursts open.
Sourdough needs support during cold proofing to hold its shape. A banneton basket works best, and I recommend an 8″ or 9″ round one for a sourdough pumpkin. You can also use a towel-lined bowl, but if it's too wide and shallow, the dough won't stay as round and full once baked.
You can turn just about any bread into a pumpkin as long as the dough can hold its shape. Quick sweet breads like banana bread, for example, wouldn’t work because they are a batter and not a shaped dough.
For this post, I used my regular no-knead sourdough recipe. But any bread dough, from sourdough sandwich bread to fresh-milled dinner rolls, will work.
My sourdough pumpkins kept bursting, as you can see in some of the white pumpkin photos. This can happen if the dough is underproofed, overproofed, too dry, or not scored enough to release steam. But even if it bursts a little, it’s still beautiful-and delicious!
Let's Connect!
If you tried this recipe and loved it, leave a comment or review below.
Also, don't forget to pin this post and follow Moon + Magnolia on Pinterest. You can save all my recipes on your boards and keep up with the latest happenings!
Share your creations on Instagram and tag @moon_and_magnolia!

How To Make Pumpkin-Shaped Sourdough
Ingredients
- Parchment paper
- Cutting board
- Butchers twine
- Scissors
- Lame
- Cast iron Dutch oven
- Cinnamon stick
- Bay leaves
Instructions
- I use my regular no-knead sourdough recipe. But you can use your favorite. These instructions assume you have already made, fermented, and cold-proofed your bread dough.
Preheat and Prepare
- Prepare your dough as you normally would. Shape the dough into a tight ball for a round loaf. When you are ready to bake, preheat a cast iron Dutch oven to the temperature the recipe recommends.
- Leave the dough in the fridge while you prep the supplies.
- Cut 4 pieces of butchers twine about 36-40 inches long. Tie them in a knot in the middle. This will keep them in place as you shape the dough.
Make the Pumpkin Shape
- Remove the dough from the fridge, but keep it in the banneton basket or towel-lined bowl.
- Place the knotted twine vertically across the top of the dough. Make sure the knot is in the center of the dough.
- Spread and align the twine so that it creates 8 equal sections.
- Place a piece of parchment paper over the dough. Make sure the banneton, dough, and string are fully covered.
- Place a cutting board on top of the parchment-covered banneton basket and use it to turn the dough over.
- Rub a light coating of flour on the dough. This will make your scoring stand out and help prevent the butchers twine from sticking. Note: you can skip this step if you prefer a toasted look rather than a white boule (I skipped this part for the main photo in this post).
- If needed, readjust the strings so they are even. Then, grab two strings from opposite ends and tie a knot at the center of the dough. The string should be snug against the dough but shouldn't cut or pinch into it.
- Cut the excess string above the knot.
- Repeat with each string, ensuring the knots are centered on the dough.
- Optional: with a bread lame, add designs to each section on top of the loaf.
Bake the Bread
- Use the parchment paper to transfer the dough to the hot Dutch oven.
- Follow the recipe instructions for baking.
- When the bread is done, transfer it to a wire rack to cool. When it is cool to the touch, remove the string. I usually cut strings at the top and pull them out gently. They can get a little embedded in the bread, but give them a little tug, and they should come out.
- Use a small knife to pop a hole in the center of the dough, and insert half of a cinnamon stick for the stem. Add bay leaves for a cute finishing touch.
Notes
- Soaking the butcher's twine in oil can make removing it easier. I usually skip this step, but it is helpful if you find it hard to remove the twine.
- Before arranging the twine across the dough, knot it together in the middle. This makes it much easier to turn the dough over without losing the twine's placement.
- The baking process isn't complete until the bread is room temperature. So don't remove the string or cut into the bread until it is cool to the touch. Waiting to eat it is the hardest part of the process, haha!
- Baking sourdough while it's cold creates more steam, resulting in a fuller loaf of bread. Sourdough can expand up to 30% in the oven! So, oven spring is the difference between a flat sourdough pumpkin and one with a plump, round shape.
- In the same vein as above, a Dutch oven holds the steam to create a better oven spring.
- Though it looks like just a few pieces of string, you specifically need butcher's twine because it is food- and oven-safe.
Nutrition information is auto-calculated and may not reflect your final product. Please verify independently if needed.