This post may contain affiliate links. Please read our disclosure policy.
Rich, creamy, and studded with chocolate and chopped nuts, this chocolate chip cheese ball recipe strikes the perfect balance of sweet and savory. Ideal for holiday parties and gifting, and stealing the show on appetizer trays.
If you want a dessert that is as beautiful as it is delicious, this chocolate chip cheese ball recipe is it.
It’s the perfect balance of sweet, creamy flavors, and it’s so easy, I make it for just about every holiday and family gathering.
Unlike savory cheese ball recipes, this sweet version pairs perfectly with graham crackers, marshmallows, pretzels, brownies, and even toasted sourdough bread.
It's indulgent, crowd-pleasing, and extremely simple to make at home. It’s one of my favorites for parties because it’s a no-bake dessert that takes just a few minutes of hands-on time.
I serve it as a holiday dessert or party appetizer and pair it with homemade marshmallows, holiday cookies, or spiced bread.
Why You’ll Love This Recipe
No Bake: This chocolate chip cheese ball recipe requires no oven time. It’s simple and forgiving, and it comes together in a few minutes.
Perfect for Gatherings: Its stunning presentation and melt-in-your-mouth sweetness make it a showstopper at any party.
Customizable: Make it your own by mixing in your favorite toppings, like sprinkles, other nut varieties, or chocolate chip flavors.
Make-Ahead Friendly: Prepare this chocolate chip cheese ball a day or two in advance to let the flavors meld and save time on the big day.
Crowd-Pleaser: Kids and adults alike cannot get enough of its chocolaty goodness.
About This Recipe
This recipe is adapted from Allrecipes‘ chocolate chip cheese ball. It holds a special place in my heart because I made this at my very first dinner party many moons ago.
I’ve adjusted a few ingredients and added more tips and tricks throughout the post for making and serving this recipe.
Ingredients
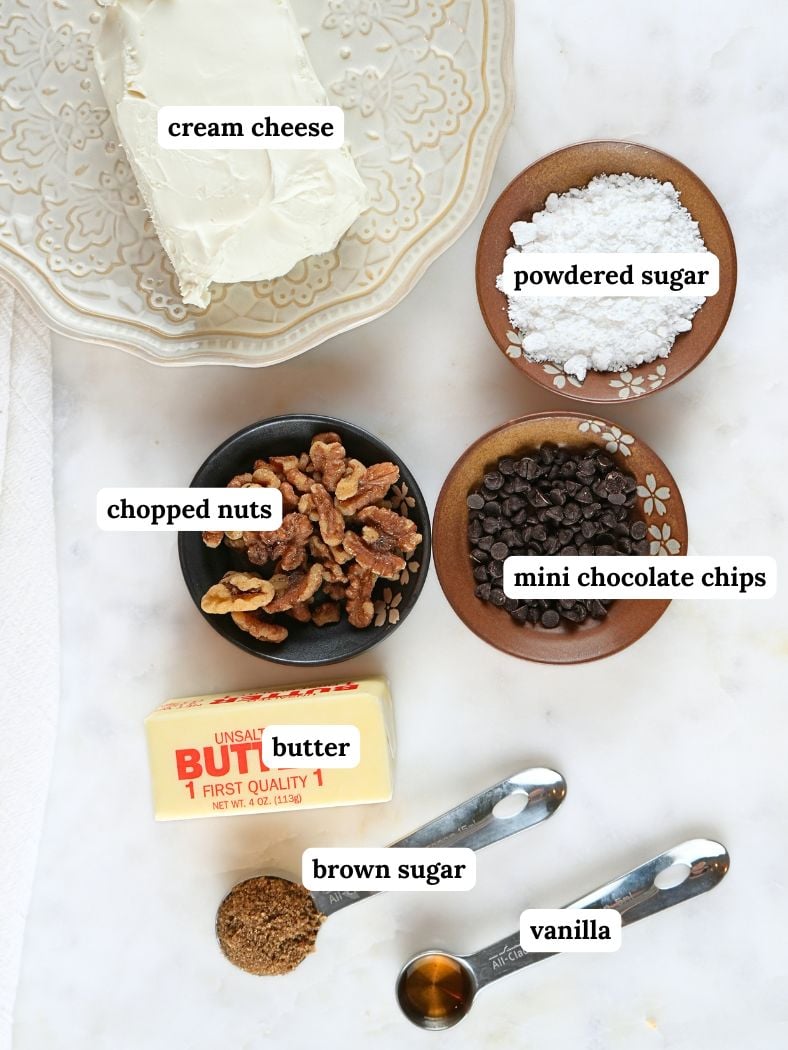
Cream Cheese: Use full-fat block cream cheese (not whipped) and let it soften first for the creamiest, smoothest chocolate chip cheese ball.
Butter: Be sure to use unsalted butter to keep the sweet-and-salty ratio just right.
Sugar: You’ll need powdered sugar and brown sugar. I prefer dark brown sugar, but light brown will also work.
Vanilla: I used homemade vanilla with bourbon, but any vanilla extract will work.
Chocolate Chips: I prefer mini chocolate chips. Standard chocolate chips will also work, but I recommend chopping them up a little for the best texture. You can also use a chopped chocolate bar.
Nuts: I prefer walnuts or pecans. However, any chopped nut will work.
Get the full ingredient list and measurements on the printable recipe card below.
Tools You Will Need
Stand Mixer: I used my KitchenAid bowl-lift stand mixer. A hand mixer will also get the job done.
Wooden Spoon or Spatula: Use a sturdy wooden spoon or a flexible spatula to scrape down the sides of the bowl, ensuring every ingredient is incorporated.
Step-by-Step Instructions
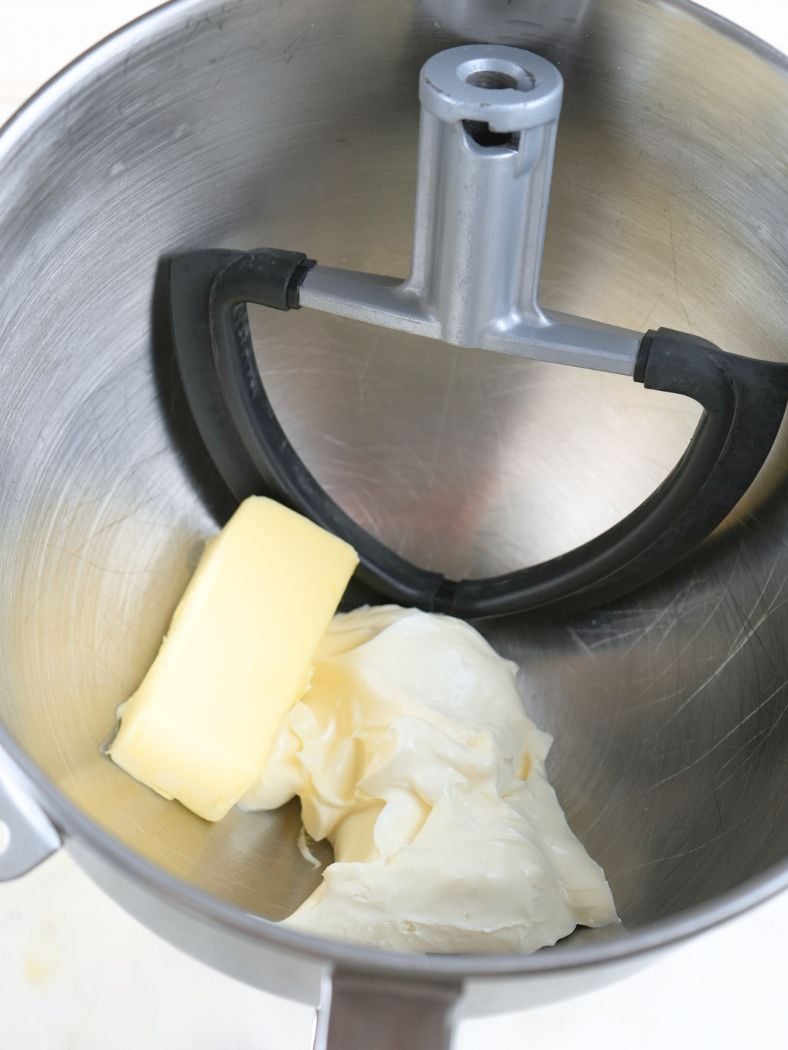
Step 1: In the bowl of a stand mixer fitted with a paddle attachment, beat the cream cheese and butter on medium speed until smooth and combined.
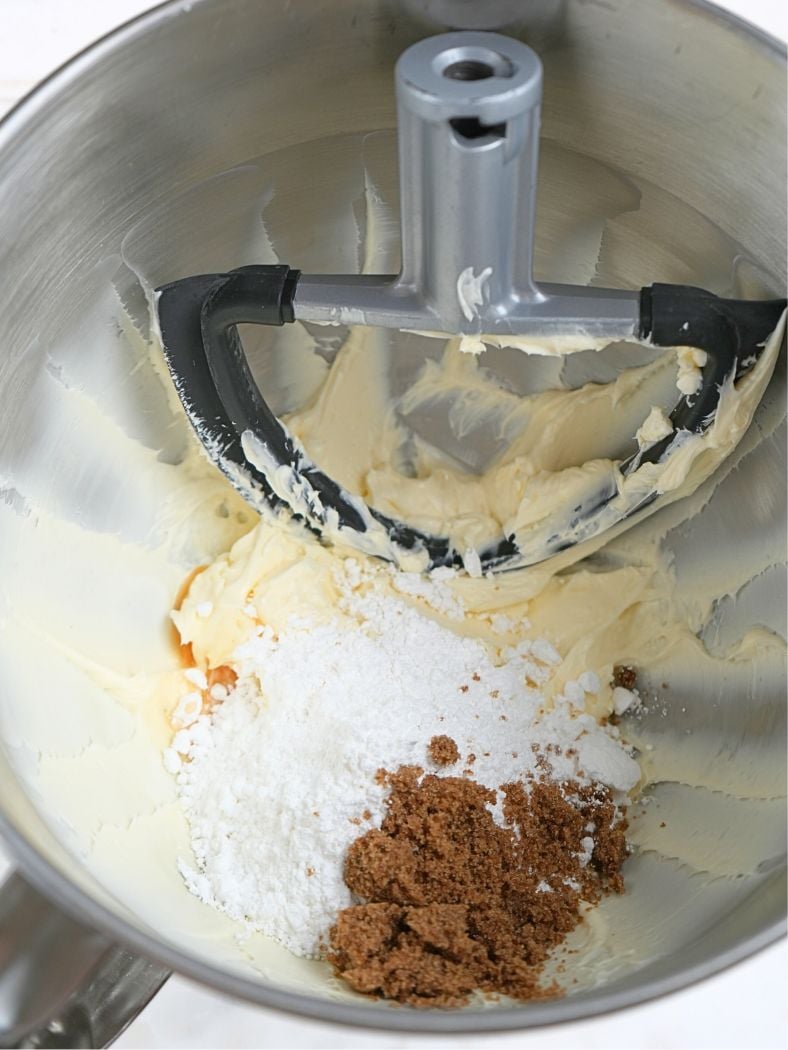
Step 2: Add the powdered sugar, brown sugar, vanilla, and a pinch of salt.
Mix on medium speed until combined.
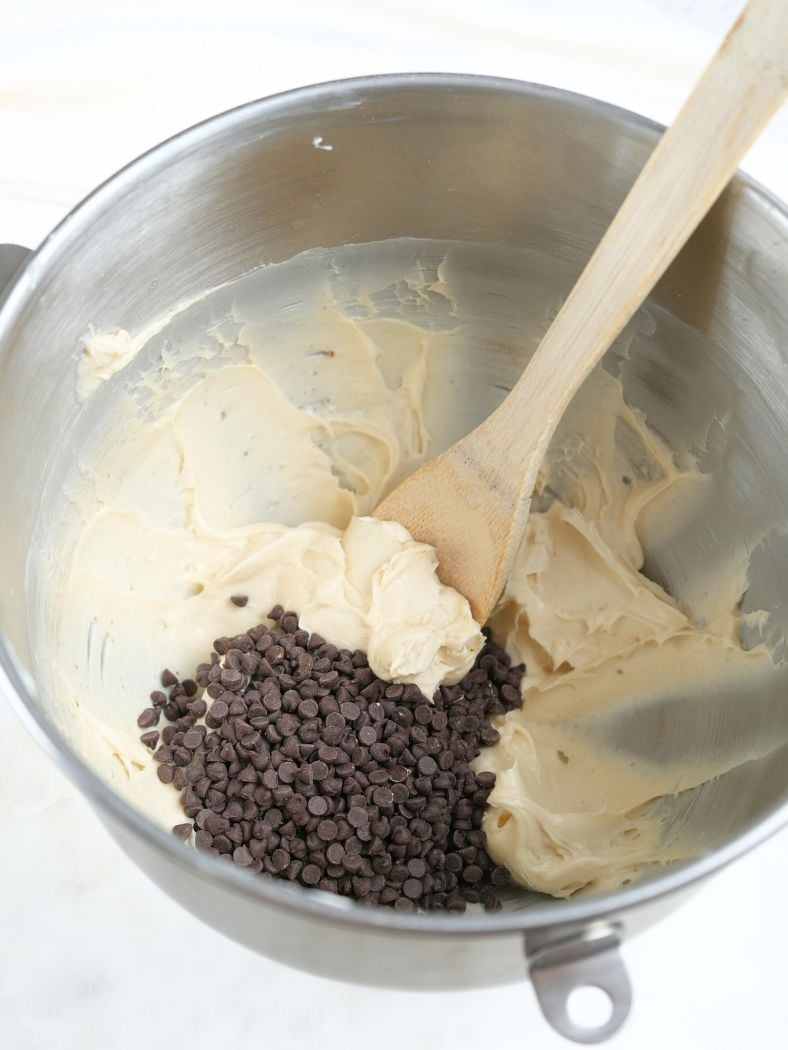
Step 1: Use a wooden spoon or spatula to stir in the mini chocolate chips.
Cover the bowl and refrigerate for at least 2 hours or overnight.

Step 2: Cover the bowl and refrigerate for at least 2 hours or overnight.
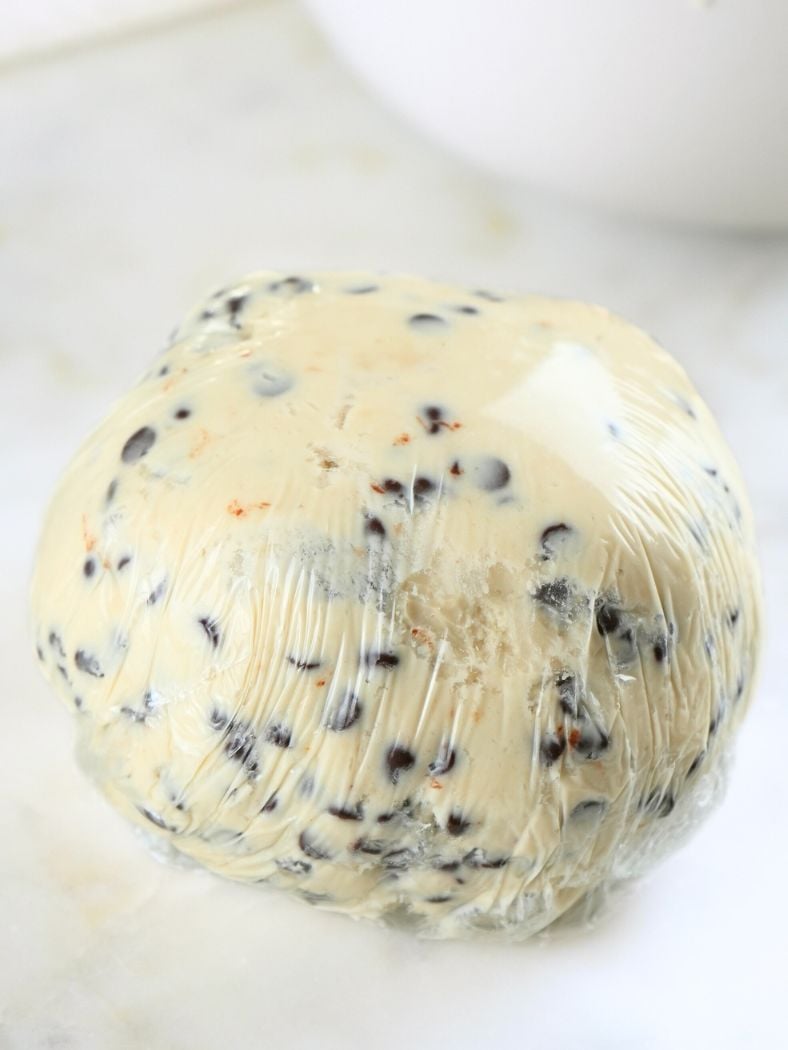
Step 5: Once chilled, shape the mixture into a ball.
Wrap it tightly in plastic wrap and refrigerate for at least 1 hour to firm up.

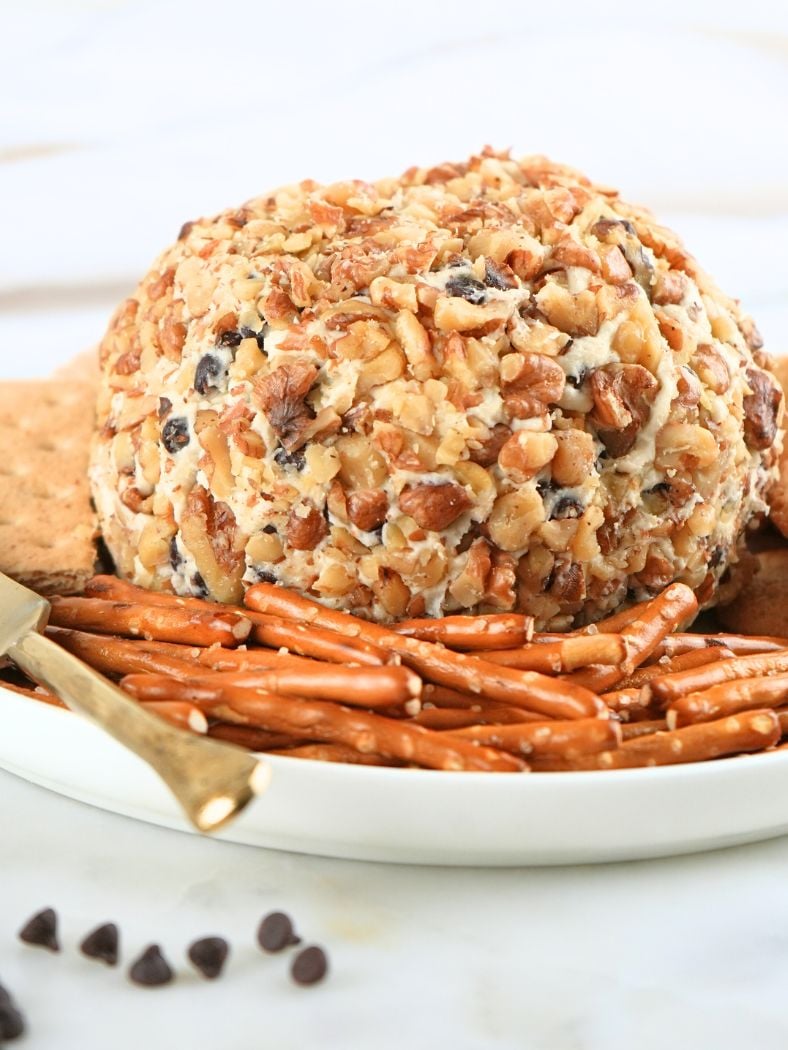
Step 6: When ready to serve, unwrap the cheese ball and roll it in the chopped nuts.
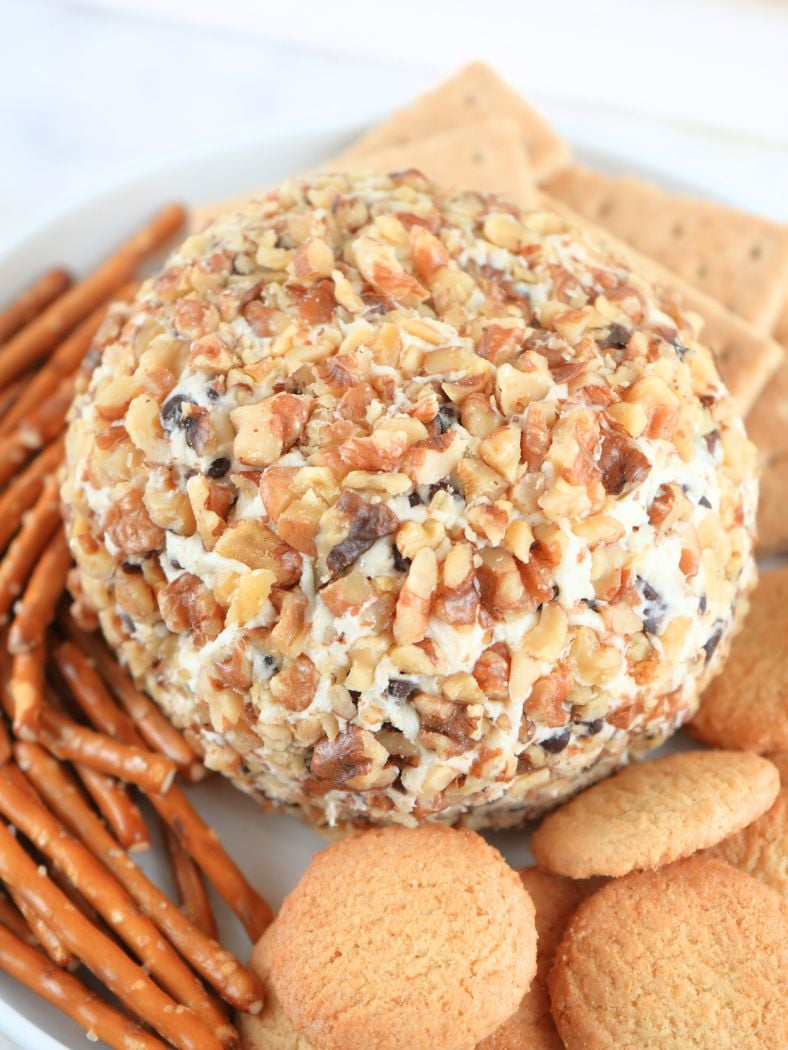
Step 7: Transfer it to a platter and serve with pretzels, graham crackers, or even on sourdough pancakes or crepes.
Tips for Success
- Start with room temperature ingredients. Cold cream cheese and butter won’t mix smoothly, so soften them on the counter for at least 30 minutes.
- Use block-style cream cheese. Whipped cream cheese is too difficult to mold and won’t hold the ball shape well.
- Don’t skip the chill time. The refrigeration time will make the cheese ball easier to shape and coat. Chill it for at least 1 hour to firm it up.
Serving Suggestions
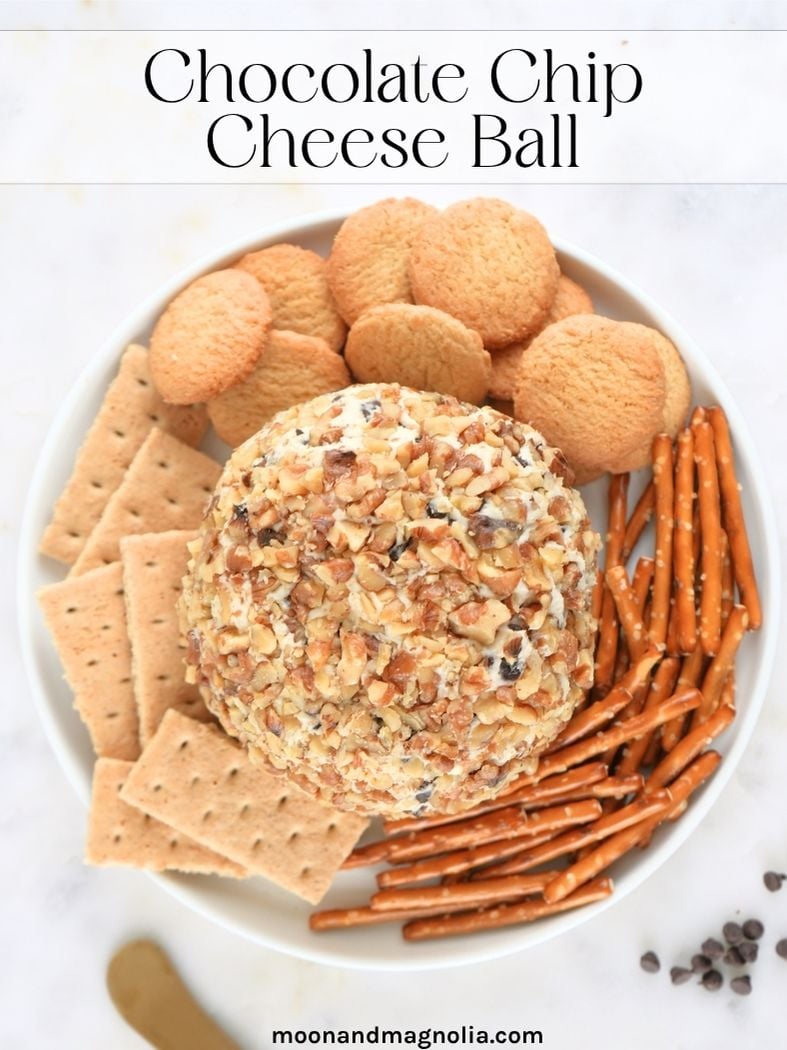
Graham Crackers: Pair this rich, creamy recipe with crisp, sweet graham crackers for the perfect balance of flavor and texture.
Nilla Wafers: A shmear of chocolate chip cheese ball makes a great filling for vanilla wafer sandwiches.
Pretzels: I love this with pretzels. You can even use it as a dip for sourdough soft pretzels.
Sourdough: Spread it on sourdough pancakes, crepes, or toast
Dessert Platter: This chocolate cheese ball steals the show on any dessert platter.
Storing
- Store leftovers tightly wrapped in plastic wrap or in an airtight container in the fridge up to 5 days.

Variations
Peanut Butter: Stir in your favorite creamy or crunchy peanut butter. Add one tablespoon to the main cheese ball ingredients before combining.
Mint Chocolate: Give your cheese ball a minty twist by swapping regular chocolate chips for mint chocolate chips.
Holiday Twist: Add festive cheer by rolling the cheese ball in holiday sprinkles. Or swap the chocolate chips with holiday mini M&Ms.
Dip: Skip rolling it into a ball and serve this as an easy dessert dip.
FAQs
Yes! Just adjust the ingredient amounts proportionally. Smaller cheeseballs are perfect for gifting or individual servings, while larger ones shine at holiday parties or big gatherings.
Absolutely! It actually tastes better after chilling for a few hours or overnight, allowing the flavors to meld and the texture to firm up.
For the best results, stick with block cream cheese. Whipped cream cheese can make the mixture too soft and difficult to shape.
Yes! Simply skip the nuts and roll your cheeseball in shredded coconut, crushed cookies, sprinkles, or mini chocolate chips.
Definitely! Try mini chocolate chips, peppermint, peanut butter, or even dried fruit to create your own unique twist.

Let's Connect!
If you tried this recipe and loved it, leave a comment or review below.
Also, don't forget to pin this post and follow Moon + Magnolia on Pinterest. You can save all my recipes on your boards and keep up with the latest happenings!
Share your creations on Instagram and tag @moon_and_magnolia


Chocolate Chip Cheese Ball
Equipment
Ingredients
- 8 ounces plain cream cheese, softened
- 1/2 cup unsalted butter, softened
- 3/4 cup powdered sugar
- 2 tablespoons dark brown sugar, packed
- 1/2 teaspoon vanilla extract
- pinch of salt
- 3/4 cup mini chocolate chips
- 3/4 cup chopped pecans or walnuts
Instructions
- In the bowl of a stand mixer fitted with a paddle attachment, beat the cream cheese and butter on medium speed until smooth and combined.8 ounces plain cream cheese, 1/2 cup unsalted butter
- Add the powdered sugar, brown sugar, vanilla, and a pinch of salt. Mix on medium speed until combined.3/4 cup powdered sugar, 2 tablespoons dark brown sugar, 1/2 teaspoon vanilla extract, pinch of salt
- Use a wooden spoon or spatula to stir in the mini chocolate chips.3/4 cup mini chocolate chips
- Cover the bowl and refrigerate for at least 2 hours or overnight.
- Once chilled, shape the mixture into a ball. Wrap it tightly in plastic wrap and refrigerate for at least 1 hour to firm up.
- When ready to serve, unwrap the cheese ball and roll it in the chopped nuts.3/4 cup chopped pecans or walnuts
- Transfer it to a platter and serve with pretzels, graham crackers, or even on sourdough pancakes or crepes.
Notes
- Start with room temperature ingredients. Cold cream cheese and butter won’t mix smoothly, so soften them on the counter for at least 30 minutes before making.
- Use block-style cream cheese. Whipped cream cheese is too difficult to mold and won’t hold the ball shape well.
- Don’t skip the chill time. The refrigeration time will make the cheese ball easier to shape and coat. Chill it for at least 1 hour to firm it up.
Nutrition
Nutrition information is auto-calculated and may not reflect your final product. Please verify independently if needed.


This recipe is so easy! I like to bring it to holiday pot lucks because it’s quick and always a crowd pleaser.