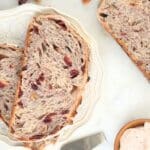
Sourdough Cranberry Walnut Bread
Classic no-knead sourdough is filled with juicy cranberries and toasted walnuts. The outside is golden and crusty, while the inside is chewy and light with little bites of sweet berries and crunchy walnuts. This will be your go-to bread for the holiday season!
Servings: 1 boule
Calories: 224kcal
Ingredients
- 375 g 3 cups all-purpose flour
- 100 g 3/4 cup whole wheat flour
- 100 g 1/2 cup sourdough starter, active and bubbly
- 325 g 1 1/3 cup water (plus more for soaking the cranberries)
- 10 g 1 3/4 teaspoon coarse kosher salt
- 100 g 1 cup dried cranberries
- 75 g 2/3 cup walnut halves
Instructions
Prepare the Dough
- In a large mixing bowl, combine all-purpose flour, whole wheat flour, and water.
- Mix until combined. Allow to sit for 30-45 minutes.
- Add the sourdough starter and salt. Mix by hand for five minutes. Remember, you aren’t kneading here; instead, you are gently combining the ingredients.
- Using a wet hand can make this somewhat less messy.
- Cover with a damp towel and let rest for 30 minutes.
Prepare the Inclusions
- Meanwhile, add the dried cranberries to a small bowl. Fill the bowl with enough water to cover the berries. Set aside.
- Heat a skillet over medium-high heat.
- Toast the walnuts in a dry skillet over medium-high heat, stirring frequently for about 5 minutes until aromatic.
- Transfer the walnuts to a plate to cool for a few minutes.
- Once the walnuts have cooled, chop them into bite-sized pieces. Set aside.
Stretch and Fold the Dough
- After the dough has rested for 30 minutes, begin the stretch and fold process (check out the link for more details about how to stretch and fold dough).
- Do one cycle of stretch and folds. Stretch and fold the dough until you begin to feel resistance from the dough. This first cycle helps build enough strength in the dough to hold the inclusions later.
- Cover with a damp towel. Set aside for 15 minutes.
- Drain the cranberries. Then, add the cranberries and the chopped walnuts to the dough.
- The inclusions will mix into the dough through the stretch and fold process.
- Stretch the dough up, grabbing some of the inclusions with the dough. I like to gently squeeze the dough as I stretch it to work them in gently.
- Then, fold the dough over. Repeat this process until you notice resistance from the dough. Cover with a damp towel. Set aside for 15 minutes.
- After 15 minutes, do another cycle of stretch and folds. Set aside for 30 minutes.
- Do three more cycles of stretch and folds with 30 minutes of rest between.
- Cover with a damp towel between cycles.
Bulk Ferment the Dough
- After all stretch and fold cycles are complete, cover with a damp towel and allow to rest on the counter at room temperature for 5-6 hours or until doubled.
- I’ve found that any space below 70 degrees slows down the process, so find a warm spot. If you don’t have a warm enough spot, you can also use a proofing box.
Shape and Cold Proof the Dough
- Once the dough has doubled, turn it out onto a clean counter or work surface.
- Shape the dough into a ball by turning and spinning it toward yourself. The friction on the dry counter will create tension and aid in shaping.
- You might lose a few inclusions along the way, but don’t worry about it. That’s pretty normal when working with inclusions.
- Let the dough rest for 15-20 minutes.
- Place each ball into a floured banneton basket or towel-lined bowl FACE DOWN.
- Pinch the left and right sides together. Then, pinch the top and bottom together. This creates tension and a nice seam.
- Cover it with plastic wrap or a plastic bag (I like to use a plastic shopping bag), and stick it in the fridge for 12-15 hours.
Bake the Bread!
- Preheat the oven to 500° F with a cast iron Dutch oven inside. Allow the Dutch oven to warm with the oven and stay in for about 20 minutes to get scorching hot.
- Once the Dutch oven is ready, remove the dough from the fridge and gently turn it onto parchment paper. Since it was placed in the basket facedown, when you turn it out it should now be right side up with the smooth side on top.
- Rub the top of the dough with a little flour and score using a razor blade or lame.
- Place the dough on the parchment paper in the hot Dutch oven.
- With the Dutch oven lid on, bake at 500° F for 25 minutes.
- Take the lid off, drop the temperature to 475° F, and bake for approximately 15 minutes or until golden. Ovens vary, and mine takes about 12 minutes at this point. Bread is generally considered done at 190° F internal temperature.
- Remove from Dutch oven and let cool to room temp on a wire rack.
Notes
- The first round of stretch and folds without the inclusions is important for building strength. You want the dough to be strong enough to hold the inclusions. So don't add them until the second cycle.
- Of course, you don’t want to overferment your dough. But I like to ferment mine a little longer to create a fluffier loaf. The light, open crumb paired with the inclusions is so good!
- Don’t worry if some of the inclusions fall out. That’s pretty normal when adding bits and pieces to sourdough.
- If you don’t have a Dutch oven, while preheating the oven, place a skillet filled with water on the bottom rack. Bake the bread on a cookie sheet on the rack above the water. It won’t be quite the same as using a Dutch oven, but you’ll still have delicious bread.
Nutrition
Serving: 1 | Calories: 224kcal | Carbohydrates: 41g | Protein: 6g | Fat: 5g | Polyunsaturated Fat: 4g | Sodium: 326mg | Fiber: 3g | Sugar: 6g
