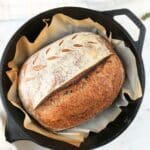
Half Fresh-Milled Sourdough Bread
Half fresh-milled sourdough bread strikes the perfect balance between a classic boule's crusty, chewy texture and a mild, earthy flavor of fresh-milled sourdough. It’s a great option for graining milling beginners, picky eaters, or anyone who wants the best of both worlds.
Servings: 12 slices (1 boule)
Calories: 146kcal
Equipment
- Grain Mill
Ingredients
- 235 g finely milled hard wheat berries red or white
- 235 g all-purpose flour
- 100 g sourdough starter active and bubbly
- 330 g water
- 10 g salt
Instructions
Prep the Dough
- Just before prepping the dough, mill the hard wheat berries on the finest setting.235 g finely milled hard wheat berries
- In a large mixing bowl, add the freshly milled flour, all-purpose flour, sourdough starter, water, and salt.235 g all-purpose flour, 100 g sourdough starter, 330 g water, 10 g salt
- Use a Danish dough whisk or your hands to combine the ingredients until there are no dry bits in the bowl. I often wet my hands a few times to help pick up the dry flour on the bottom of the bowl. Cover with a damp towel and let the dough rest for 30 minutes (this helps the fresh-milled flour absorb the liquid, so don't skip this step).
- Using your hands, mix the dough for 5 minutes. If the dough is sticky, wet your hands a few times to help prevent sticking. Cover with a damp towel and set aside for 30 minutes.
Stretch and Folds
- Stretch and fold the dough 5-8 times (until you notice resistance from the dough). Do this for three cycles in 15-minute intervals. Cover with a damp towel between cycles.
- Increase the stretch and fold cycles to every 30 minutes. Complete three cycles of stretch and folds. Cover with a damp towel between cycles.
Bulk Ferment and Proof
- After all stretch and fold cycles are complete, cover with a damp towel and allow to rest on the counter for 5-6 hours or until doubled and bubbles are forming around the top edges of the dough. I’ve found that any space below 73° F slows down the process. So, find a warm spot or use a proofing box.
- Once the dough has doubled, turn it out onto a clean counter or work surface.
- Shape the dough into a ball by turning and spinning it toward yourself. The friction on the dry counter will create tension and aid in shaping. Then, let the dough rest for 20 minutes.
- Using a bench scraper, place the dough ball into a floured banneton basket or floured tea towel-lined bowl FACE DOWN.
- Stitch the dough by folding and pinching small sections from opposite sides toward the center, overlapping them to create a zigzag pattern. Then, fold and pinch the short ends to create tension and seal the seam. Repeat the stitching a second time. This process helps create a better ovenspring.
- Cover with plastic (I like to use a plastic shopping bag), and stick in the fridge for 12-15 hours.
The Next Day
- Preheat the oven to 500° F with a cast iron Dutch oven inside.
- Once the oven is preheated and the Dutch oven is scorching hot, turn the dough out onto a piece of parchment paper.
- Rub the top of the dough with all-purpose flour and score using a razor blade or lame.
- Use the parchment like a sling to transfer the dough to the hot Dutch oven (the parchment also goes into the Dutch oven).
- With the Dutch oven lid on, bake at 500° F for 25 minutes.
- Remove the lid, drop the temp to 475° F, and bake for 12 minutes or until the internal temperature reaches 190-200° F.
- Remove from Dutch oven and let cool to room temp on a wire rack before slicing and serving.
Notes
- For the best results, use a kitchen scale to weigh the ingredients.
- Fresh-milled flour absorbs water slowly, so the 30-minute rest (aka autolyse) is key for an easy-to-handle dough. Don't skip it!
- Your starter doesn’t need to be made with fresh-milled flour, so use whatever sourdough starter you have. Most of the benefits of fresh-milled flour come from the flour in the dough itself.
- Don't overthink the stretch and folds. For each cycle, complete as many stretch and folds as needed until you feel resistance from the dough. That’s your sign to let it rest before the next round.
- To keep the dough from sticking to your hands, wet them before mixing or doing stretch and folds. I like to stand near the sink so I can easily rewet my hands.
Nutrition
Serving: 1slice | Calories: 146kcal | Carbohydrates: 30g | Protein: 5g | Fat: 1g | Saturated Fat: 0.1g | Polyunsaturated Fat: 0.3g | Monounsaturated Fat: 0.1g | Sodium: 325mg | Potassium: 92mg | Fiber: 3g | Sugar: 0.1g | Calcium: 7mg | Iron: 2mg
